Back in 2012, it was an abnormally cold October for New Jersey when Hurricane Sandy blew through and left us without power for 2 weeks. It was at that time I knew I needed to learn preparedness skills, and building a space heater that did not require electricity was high on my list.
I will never forget how cold we were and how we were using gas powered heaters (which I DO NOT recommend) to get some warmth.
Thankfully we had friends we were able to stay with – but that is not always the case for others and I hated putting friends out.
So, I hope this post comes in handy for you so you can create your own warmth if an emergency arises.
Luckily, there are several ways to warm up your home without spending an arm and a leg. Note that there are also battery-operated heaters that you can use whenever there is no electricity.
Does a DIY Homemade Heater Actually Work?
I’d seen a few ideas for a homemade space heater floating around Pinterest and Facebook. But, I heard mixed reviews from various people, and I wanted to find out if they actually worked.
So, I tried a few different methods and options. The slow cooker method did not work well for me, and using just one terra cotta pot was a fail also.
I decided to combine various strategies, and I found a way to make a homemade space heater that worked!
Now don’t get too crazy excited – this little homemade space heater isn’t going to heat your whole house or even your entire master bedroom. But it will increase the temperature a few degrees in a small room – which would be awesome during a winter power outage.
The idea came from a Youtube video, although I discovered that the method warmed the area up faster if I used a cake pan with the pot tilted.
How to Make a Homemade Space Heater:
Things you’ll need:
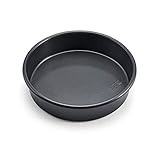
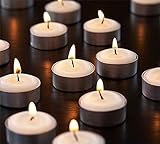

I lit five tea lights and placed them in an 8-inch cake pan. The cheapest place to get them is Ikea, but if there isn’t one near you, try Amazon.
Next, I placed a 6-inch terra-cotta pot over the tealights at an angle. By tilting the pot, the candles get enough oxygen to burn but don’t lose too much heat out of the bottom. I also put an empty tea light holder over the hole in the pot.
Then I put another 8-inch terra-cotta pot over the first smaller one.
I closed the door and waited, and it took about 3-5 minutes before warm air began flowing out of the top of the pot. It took another 20-30 minutes for the inside of the room to feel more heated than the outside. In total, it felt significantly warmer in about an hour. However, the bathroom that I put the DIY heater in wasn’t really big. But it DID warm it up! In fact, after three hours (and changing out the tea lights once), the room was quite toasty.
I was thrilled! I bought a 2nd set of pots, and if my family is ever faced with a power outage during the winter, we will use two of these homemade space heaters in our smallest bedroom where we would all sleep.

It takes about 40 tealights per day to keep both rooms warm all day (except for the nighttime when we couldn’t monitor it). I plan to store one 6-gallon bucket’s worth of candles just in case, and that will last for about 40 days. What a simple and inexpensive way to heat a room!
Note: The pan and the inside of the pot get VERY hot. Keep a protective pad nearby so you can change out the tea lights every few hours.
If you don’t like the hot pot or you want to create a more permanent heater that looks nice, check out this video!
UPDATE: I had to use this homemade space heater a few months after posting this when our furnace stopped working for a few days. I used three DIY heater pots and was able to keep our living room above 60 degrees when it was 20 degrees outside. However, the rest of the house was approximately 50 degrees.
But, MAKE SURE you watch them! I let them burn for hours and eventually, all of the candles in one of the pots created one big flame. Oops! I grabbed the baking soda, and all was well, but be careful!
Additional Homemade Space Heater Options
I tried the tealight homemade space heater method, and it worked great. However, there are other do-it-yourself techniques you can try. You might find that you like one more than the other, so I thought I’d give you the alternative options as well.
Homemade Ceramic Heater
This particular technique is great for warming up a medium-sized room. Ceramic has thermal properties and this method utilizes it to create heat. Here’s what you’ll need:
- Four to five bricks
- A tray for candles
- A small fan
- Ceramic bowl or stoneware
- Pick a spot in the room you want to warm up, and put it in an area where there’s not a lot of foot traffic. Also, be sure to place the heater on a table or stand that’s not flammable, like a metal table.
- Put the candles on the stand and place two bricks beside the tray.
- Light the candles and place the ceramic bowl over the tray by laying its edge on the bricks.
- Lastly, put two or three bricks behind the bowl and set the fan on top of the bricks.
All you have to do is turn on the fan and the wind will blow warm air. The heat absorbancy from the bowl makes this homemade heater work wonders, and it doesn’t take long to heat up.
Alcohol Heater for Homemade Space Heater
This method is perfect to use in emergency situations. It allows you to cook and keep your area warm in case of an outage. Here are the products you’ll need:
- Metal cans (like paint or soup cans)
- Rubbing alcohol
- Rolls of toilet paper
1. Put the roll of tissue in the can.
2. Pour enough alcohol over the toilet paper so that it’s drenched.
3. Ignite it with a lighter or match.
This technique is a bit riskier, but it’s safe as long as you’re careful. Again, this might not be an everyday method, but it will surely come in handy if need be.
Suggested Read: My Two Favorite Powerless Cooking Tools
RELATED READS
Homemade Space Solar Heater
If you’re someone who likes to use natural energy, this heating method is for you. This solar heater is made from lots of aluminum cans, so if you recycle, it’s a good way to use your old cans. You’ll spend a lot more time doing this one, but I think it’s worth it. Not only that but it’s a cost-effective method that provides long-term heating solutions. Here’s what it requires:
- 240 aluminum cans
- 4 ft x 8 ft x ½ -inch plywood
- 4ft x 8 ft Plexiglas
- High-temperature silicon
- Heat-resistant black spray paint
- Plastic tube
- Drill machine with wide drill bits
- An air blower that works via solar power
- Wood for the 4 ft x 8 ft x 3.5-inch frame
- Create a 4 feet* 8 feet * 3.5-inch wooden frame with the wood sheet. Next, nail the plywood sheet that’s the same size to the back of the frame.
- Drill two holes into the frame; one at the top and the other at the bottom.
- Drill large holes in each side of the cans, but only drill16 of the cans at the top only. They will be used for the bottom row.
- Place them on top of one another and seal the joint area with silicons. Create 16 columns of cans, each containing 15 cans.
- Give the silicone time to cure and spray the black paint on them and on the frame.
- Place the columns into the frame and cover them up with Plexiglas.
- Carve two holes into the area of the house where the heat is needed. One hole should be at the bottom of the wall above the floor level. The other hole needs to be at the top of the wall.
- Mount the frame on the outer wall or any area where is lots of sunlight.
- Combine both holes of the frame with the holes of the room through the plastic tube, and insulate them as much as possible.
- Install the blower at the top pipe or the low pipe to make the airflow more efficient.
The solar panel draws the cool air in from the bottom tube and pulls it towards the heat-resistant panel. Please note that this DIY heater won’t warm your room as much as an electric furnace, but it does well considering it uses only solar power.
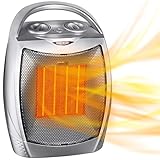
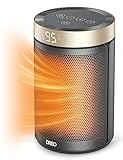
Should You Use a Portable Heater?
When you’re trying to save money on your electricity bill, your first thought may be to use a space heater instead. And although this article is about creating a DIY heater, I understand that some of you stay in really cold cities. When the temperature drops below freezing, tea-light candles might not do the trick. With that said, here are some safety precautions you should take if you decide to use a portable heater:
- Make sure the heater is in good condition. If you notice tears in the cord or any other discrepancy, it’s best to buy another one.
- Keep it away from the busy area of your home. You don’t want to expedite wear and tear or cause someone to hurt themselves
- Sit it on a firm and even floor. Don’t put it on the carpet, countertop, or furniture.
- Don’t leave the space heater unattended. Turn it off when you’re not using it or buy one that has a timer.
- Keep it away from flammable liquids and items, such as fuel, paint, couches, blankets, and curtains.
- Don’t use it to dry clothes, cook food, or thaw items.
More Cost-Effective Ways to Save for Your Heating Bill
It’s hard to sleep when you’re shivering and shaking on a cold winter night. But if even you’re trying to save a few bucks, there are plenty of inexpensive ways to keep warm.
Light The Fireplace
Nothing feels better than sitting in front of a fireplace, drinking a warm cup of hot chocolate. Not only does a fire provide a serene feeling, but it’s the perfect time to bring the family together and enjoy each other’s company.
Turn Down Your Thermostat
You’ll learn lots of heating alternatives after reading this article, so it’s okay to turn your heater down. Your heater won’t run all night long if you put in one at a lower temperature, and it’ll save you money.
Seal The Leaks In Your Home
Cold air seeps in and the heat goes out through the cracks and openings in your house. Check around your doors and window to make sure they’re sealed completely. Also, fill in gaps around pipes, vents, and other openings with caulk or weather stripping.
Close The Door
The best way to heat a room is by trapping it in. If you’re using a space heater or DIY heater, keep the door shut to maintain the temperature in the room so you can just sit back and relax while eating your eggnog.
Use a Fan
Believe it or not, turning on a ceiling fan helps keep the room warm. Put your ceiling fan on a low setting to help push the air upward. The circulation will make the warm air rise and flow downward.
The Beauty of Heated Blankets

If you don’t have any heated blankets in your home, get some! A cozy electric blanket is another low-cost alternative for getting warm during cold months. What’s best about heated covers is that you don’t have to watch them. I mentioned earlier after letting the candles burn for hours, they turned into one huge flame. Well, that’s not a concern with heated blankets.


And I don’t want to discourage you from using a homemade space heater, but I want to give you options. An electric blanket is great to use while you’re sleeping, and many of them have auto-off settings. You might have heard a few stories about electric blankets not being safe, but they are. The only time you really need to use caution is when the blanket is over 10 years old. However, if you feel a bit nervous using them, here are some safety procedures you can follow:
Use the Proper Bed
Don’t use an electric blanket on a water bed, pull-out couch, or recliner. Also, make sure you don’t use it in conjunction with a heating pad because it might overheat. Plus, the risk of higher electricity bills is waving.
Read the Product Label
Check to see if the blanket is certified by a national testing lab. Additionally, you can look up the Consumer Product Safety Commission to ensure that it hasn’t been recalled.
Get a Blanket With Auto-Shutoff
Automatic shutoff is your best bet against accidents. Simply set the timer, and let the blanket do the rest.
Final Thoughts On Using A DIY Heater
Isn’t it cool that there are so many creative ways to keep your household warm? As long as the methods you’re using to heat your home are safe, I say have at it! More importantly, you now know how to warm your house in case of an outage. Honestly, we never know when electricity will fail us and we can’t prevent a bad storm from coming through and knocking out the power lines. But we can be prepared, and that’s what really matters. You need more than one way to keep your family afloat in case of an emergency. Plus, your wallet will appreciate the less expensive bills. I hope this information was helpful to you. Let me know what DIY heating methods you’ve tried!
So, have you decided to make this DIY space heater? Try it now and let us know the results in the comments section below!
Moreover, you can learn many tips and techniques on how to become a wise and smart prepper. Try browsing our website to discover more tutorials and recommendations that will make you think you might need one. Or maybe you could have a direct interest in Easy Fire Escape Plan: 10 Min Preparedness Project.
You might also wanna check out other DIY methods like How to Make a Sleep Station, Homemade Fire Starters, and One Jar Meal.

Becky is a wildlife enthusiast and pet and livestock care expert with a diploma in canine nutrition. With over a decade of experience in animal welfare, Becky lends her expertise to Simple Family Preparedness through insightful info about pets, livestock, bee keeping, and the practicalities of homesteading.
Last update on 2024-04-25 at 06:50 / Affiliate links / Images from Amazon Product Advertising API
great idea. thank you.
You are very welcome!
I think you are smart to be prepared and love this idea even for a fun project to do with kids.
Thanks Jason!
Kind of late to respond to this article. But I’m going to put in my two cents below.
I hate to say this, but this heater would only make for a little hand warmer. If you think about it, every source of fuel only has a certain potential. There is no free lunch in physics. Below I will compare different fuels and the amount of btu’s produced. ( a BTU is the amount of energy needed to raise the temperature 1 degree C. ).
#2 fuel oil – 134,000 btu’s /gallon
Kerosene – 134,000 btu’s /gallon
Propane – 91,600 btu’s /gallon
Natural gas – 1,000,000 btu’s /thousand cu.ft
Hard Wood – 24,000,000/cord
Parafin wax – 18,621 btus / per pound
I don’t know how many tea lights would equal 1 lb of wax and I also don’t know the weight of the metal for each tea light. By looking at the figures above. You would have to burn 4.919 lbs of paraffin wax to equal the btu’s of 1 gal. of propane ( 91600 / 18621 = 4.919).
I know you guy’s are wanting to argue that the tea lights conduct and hold heat in the clay pots to radiate into this cold room making the btu figures much higher for wax than with any other form of heating. But my radiators hold heat for quite awhile dissipating heat after the furnace has shut off. So the argument is non sense.
As of 10/26/16
10 lbs paraffin wax cost $26 on Amazon.
There is 5 gal of propane in a standard 20 lb. propane tank for under $20 refill.
So to get comparable btu’s from a propane tank, I would need to burn 25 lbs of paraffin wax at a cost of $65.
Someone is going to want to argue that soy candles or some other wax base material has higher btu output than paraffin wax. I don’t know and will not argue the point but it can’t possibly differ by much. If you want to have an emergency heat source I would certainly think hard about the choice you make. I’ll stick with kerosene and propane. Both fuel sources will last until need for a long time. And I could store quite a bit for an emergency.
This might not be idea for those with allergies or sensitivity to certain fuels, but this is what I have went with as an example. I found a 23k kerosene heater to be to much for my needs. It creates to much heat for my living room and dining room when it’s running. I purchased and now use 4 Dietz #8 blizzard lanterns. These lanterns produce 1400 btu/per hr on a quart of fuel and also produce light. Four of these lanterns produce a total of 5,600 btu of heat an hour and will run 24 hours on a gallon of fuel. I have noticed that they do initially have a smell when first lit. So now I light them on the back porch and let them warm up for about 5 minutes before bringing them inside. I now don’t notice the smell from them when I do this. Occasionally I put a few drops of pine essential oil in the fuel as the wife likes the smell. I run kerosene in these lanterns and it runs great for this size wick (3/4″). The local gas station has stopped selling kerosene, but I have purchased it at my local hardware store for around $40/5gallons. In a power outage I initially run all four lanterns to warm up these two rooms ( 12′ x 27′ ) then move one into the back kitchen/bath area. 20 gals of fuel will last me a month.
I live in the Chicago area and have been without power for up to 3 day’s during winter storms. This has worked out well for me. I have used this method to stay comfortable in below freezing weather. I do have two CO2 monitors and occasionally crack a window open for fresh air. If your going to use paraffin oil in a lantern, use lanterns that have wicks less than 1/2″. The reason for this is because paraffin oil does not wick up fast enough in larger size wicks and need constant adjustment of flame height.
Constantly adding to the winter preparedness options. I now have a Dyna-Glo 20k LP vent-less wall heater installed in the downstairs living quarters. It has 3 heat settings of 12k, 16k and 20k capable of heating up to 700 sq. ft. It will work without electricity to create heat. It will continue to work as long as the gas lines are running. In a grid down situation the gas company here powers the station with their own generators to keep pressure up in the lines. I use a back up fan with power inverter/12v battery to help blow heat around. I can now take a few ceiling tiles down and keep the water pipes from freezing. And in a worse case scenario, I’ll then switch over to kerosene or propane.
Are you concerned that oxygen is being used in the room to keep these tea lights burning? I am wondering about carbon monoxide poisoning in a room after significant usage.Have you tested for this?
I haven’t tested it Carol Ann, but I’m not overly concerned. It isn’t a sealed room by any means. There is air coming in under the door, through the HVAC vents etc.
Love your ideas
Glad to hear it Edna! Thanks for stopping by!
You have some hum dinger of ideas. Some of them I never gave any thought of. So I’m going to like belonging to your news letter.
As an extension of this emergency preparedness, i wanted to share a similar to be employed in case you become stranded in a car in the snow. In addition to a warm blanket, I was always encouraged to have a coffee can filled 1/4 with sand and one candle (thicker is better) and matches or a lighter. Should the car become stranded, crack the window slightly for air source and light the candle. The heat from the flame will pretty quickly heat the inside of the car until someone comes to help
Never had to use this but was happy to have a plan in place, just in case!
Thanks Erin!
I would place a brick or thick tile under the cake pan or perhaps a cast iron frypan.the caketin seems a little thin for safety.
I haven’t tried that Nancy. I would be concerned that brick or cast iron would absorb too much of the heat, but I dunno? It could work. I’d love if you came back and let us know!
But then again, brick is similar to the material used for the pots. Maybe the fact that it would retain heat could be a good thing. It would help the whole system retain even more heat. Might take longer to heat up, but work better overall?
I have a similar set-up ready and waiting for a winter power outage. I have one important difference though: I have beeswax tea candles. The reason is that the parafin, etc in other candles and tealights is actually irritating to your respiratory system. Beeswax candles are not irritating. I figure that if it is a long lasting winterbpowernoutage, my body will already be stressed enough. I do not need to pilebon more problems by using irritating candles.
Great tip Sue. I had no idea. Thanks!
I don’t get it. What’s the point of the pot? The tea lights will give off the same total amount of heat regardless. You may have noticed if you hold your hand above a candle it’ll feel qyite warm. The only thing the pot accomplishes is the hide the tea lights, and I don’t see why you wouldn’t want to see them.
Also, I think if you do the math you’ll see that using tea lights for heat is *a lot* more expensive than getting the same amount of heat from electricity.
The clay pots absorb the heat from the candles and the heat goes on to heat the room by convection. You don’t have as much heat from plain candles.
Thanks Lilylou!
Why not just use small candles that will burn longer (without bunches of little individual containers to dispose of) instead of tea lights?
My mother lived in Holland during the depression and 2nd world war, and she showed me many things that they did to survive, this does work, glad that you shared
So I’ve looked at these, and the tea light thing is where i get hung up…does it have to be tea lights? The simple flame to wax ratio makes these burn out very quickly and be basically one use…so my question is would a single 3 wick candle be both more efficient and safely possible? it would burn much longer and doesn’t burn all the wax off as fast so you wouldn’t need to change it nearly as often.
I”ve not tried it Rebecca. The tealights last for about 4 hours though. If you give it a shot, come back at let us know how it works!
This is a very great idea and will copy the information to prepare for the coming winter.
Thanks Sandra!
This type of space heater is one everybody should know about–thanks for the clear directions!. In addition to your caution about monitoring the burning tealights closely (as one would any open flame), we would like to second your advisory about ensuring a supply of fresh air in the enclosed space being heated to avoid any possibility of carbon monoxide poisoning. (We have a little HERC oven, which runs on about 10 tealights at a time but can roast chicken and bake brownies while radiating heat for humans–and those are the two caveats the manufacturer emphasized.) Our extra tip to share: We keep a small cast-iron camp table around as a safe, non-combustible surface for either such a plant pot space heater or our tealight oven; it’s a compact and sturdy end table the rest of the time, actually., although ‘Architectural Digest’ would doubtless disdain to cover our decor if they could find it and, to be sure, POTUS did not stop by our place on his visit to the Great North, either. 😉
I have the HERC xxl and LOVE it Arche! Great tips. Thanks!
I have made 2 space heaters from terra cotta pots . I used 3 pots for each heater , 3′, 4′ 6′, an a threaded rod up the center of all three. My office is about 15 x 12 feet . Each heater will hold 4 T lites , The two heaters raised the room temperature 8 degrees in about 2 hours..
Does the cake pan get too hot – would it burn the surface it’s on?? 🙂
It does get hot Jay. Not as hot as the pot, but I wouldn’t touch it. I had mine on a granite counter top in the kitchen for a LONG time and it was okay. The test I did was in our bathroom which is a cultured stone adn doesn’t do well with heat (we don’t put curling irons on it) and it was just fine.
hey I use egg cooker as my heater! just put water and steam it
Do you think this would work for camping, or does it have to be an enclosed space? It would probably work inside a tent (if the bottom of the pan doesn’t get too hot or is on a steady, fireproof surface) but would it work like set up on a picnic table if you sit close to it?
Unfortunately, I don’t think it would work camping. It takes a while for an enclosed room to get warm. I think the heat would simply dissipate to quickly.
Wow. Cool. I ought to try it. I have all these supplies in my house.
It is simple!
Video no longer available.
Which one Rena?
What about carbon monoxide buildup?
It wouldn’t be any more / different than just burning the 5 candles alone.
Just curious…do you think this would be safe with a larger candle instead of 5 tealights? Something that would last longer?
The problem you will run into is getting enough oxygen to the candle. The tealights work b/c you can have just a small opening and still get oxygen to them. With a larger / taller candle, you’d need a larger opening and more heat would escape. (-: At least that is my guess!
Have you thought about making this an oil lamp with multiple floating wicks? You could then burn waste oil, or olive oil since it won’t smoke. More cost effective would probably be votive candles too, and they would last longer but their size is likely something which may get in the way, what do you think?
John, many people use oil in small glass jars for these as well as regular short, wide candles. Just prop the pot up with something at the bottom along the edge. I have a regular clay pot tray for my bottom. Others have figured out how to hang them as well. I also put thick nuts and washers inside, hanging from the hole.
My electric went off for about 2 days , several yrs ago.& I put 3 big fat candles in a baking pan,closed off all rooms but kit & living. It kept it very good & warm, no fuel smells & ventless heat. Needless to say, I buy up all the big candles I can find, at a reasonable price.
Good to know Teresa! Thanks!
i tried this last winter…burnt maybe 50 candles…never got more than warn on the pots….didn’t work for me.
Did you have two pots, one with the hole covered and tilted?