Life isn’t all beans, bullets, and bandages. Sometimes you get in a bind, and need to find your way out of it. In some situations, this will involve your bullets, but in others, the bad guys get the drop on you first. In these situations, the fastest draw in the world isn’t going to save you.
Counter custody skills get you out of illegal restraints. There are many places in the world where the bad guys have made a living out of snatching an oblivious traveler to get a quick ransom buck.
Elsewhere, you may find yourself the victim of a gang initiation. In Mexico driving the wrong type of car may be a mistake. Or, sometimes, you’re just in the wrong place at the wrong time.
In these situations, the key to survival may be the ability to get out of your restraints. As you will see it can be surprisingly easy. In other cases, a few improvised tools will do the job.
Let’s look at getting you the knowledge to get out of an illegal custody situation.
One quick note of caution. Never practice these techniques alone. It is remarkably easy to get into a bind beyond your skills. Always have a friend present to get you out of a situation.
The Risks of Travel
I travel for work. While it’s not as much as some of my colleagues, I am out of town every 4-6 weeks. In the last 5 years, my job has taken me around the United States and around the world. Two years ago, I traveled to seven countries in five months.
I’ve been to the United Kingdom, Europe, Asia, Africa, and the Middle East. So far, I haven’t had any trips to Central and South America. Through these travels, I have met some of the nicest people in the world. Several are friends to this day, and would gladly have them to my home to share a meal with my family.
Not all the trips have felt as welcoming. I’ve never actually been in an incident overseas, but that doesn’t stop me from being prepared.
My most recent trip was to a third world nation. I ran with heightened situational awareness every moment I was in country.
I made it home safe and sound, however, one situation woke me up just a little bit more. One afternoon on a diplomatic visit, I saw a man taken away from the front steps of the U.S. Embassy by the local Gendarme.
Embassy staff saw something I missed (from only 100 feet away) and quickly intercepted him, questioned him, then let the locals roll him up and took him away in a technical.
After this, I amped up my situational awareness even more. My head was on a turret, and I kept my stateside support group updated on an hourly schedule.
After this trip, I decided to take my personal security a step further. Time to move from book-read to practical application. I needed a new class.
Continuing Education – Prepper Style
I’m a firm believer that education never stops. I strive to take at least one class each year. I select one that furthers my survival and preparedness skills.
Topics have included urban and wilderness survival (GoRuck), trauma medicine (Dark Angel Medical), firearms and the law (Mossad Ayoob), and tactical mindset (Steve Tarani).
There is no better feeling than learning something new them mastering a skill. Pushing yourself beyond your perceived limits both mental and physical is the greatest reward.
I recently participated in the first day of a counter custody class taught by Ed Calderon (www.edsmanifesto.com). This class presented both mental and physical aspects of surviving illegal restraint.
A large segment of the day addressed getting into and out of duct tape, zip ties, and handcuffs. Some information I had gleaned from YouTube university, while other techniques were astonishing in their simplicity!
The class included an escape and evasion kit from SerePick Covert Entry. With this kit we had the tools to escape all restraint examples in the class. Specifically, the kit included:
- OSS Toolset (lock picks)
- Delta Keys (handcuff keys)
- Handcuff Shims
- Kevlar Cordage
- Quick Sticks (padlock picks)
By the end of the class we were proficient with each of the tools provided.
In the end, it was another set of skills learned, and another perspective to add to my own. I can now expand the “survivable” portion of my threat matrix. Here are a few lessons from the class.
How to Escape Duct Tape
Duct tape is one of the most visceral means of restraint. We see it in movies. We see it in “ripped from the headlines” TV shows. We’ve even seen it used in documentaries. Duct tape is everywhere!
The sound of a length of tape pulled off a roll is unmistakable. If your hands are behind your back and you hear that noise… It’s Over!
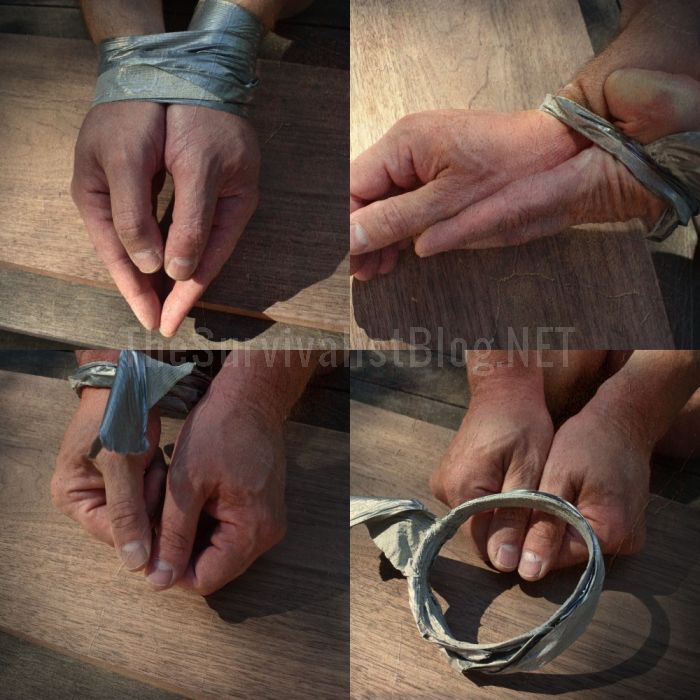
The class presented several examples of people restrained by nothing more than duct tape. Unfortunately for them, they didn’t have Ed as a teacher.
Duct tape has two weaknesses movement and moisture. Applying these will get you out of 99% of duct tape restraints.
The good news is that moisture happens all on its own. Under the stress of illegal custody, you’ll be sweating. Even if you are not your skin is perspiring constantly. This little bit of water and oils work to loosen the adhesive.
The real work happens with your hands. Move your fingers, hands, and wrists. The progression of freedom will be slow, but within a minute or two, you will have gained enough room to move more and flex more.
Pretty soon, your hands will be free. This works for hands, arms, feet, mouth. Everywhere duct tape is applied.
The trick of quickly pulling your hands against your chest and tearing the tape is a viable option with one problem. An experienced attacker will twist the duct tape around itself forming a rope. They do this and you’ll need a less dynamic approach.
Start with fingers, small wiggles, and keep at it. It’s amazing how this visceral and frightening restraint method can be so easily defeated.
How to Escape Zip Ties
Zip ties are cheap and effective. You can get them at any big box store. The issue is variability. Some are easy to defeat, others are difficult.
Your garden variety cheap ties can be broken in one quick movement. Start with your hands over your head. Then quickly and forcefully bring them down then across your stomach.
You are using your body as a wedge to split your hands apart. For the thin and cheap ties, this will split them and free your hands. It’s quite empowering.
You can even do this if your hands are bound behind you. Pulling your hands forward across your hips will accomplish the same wedge action. It’s much more difficult, and requires practice however, it can be done.
There are three issues with these techniques. First, bad guys rarely use cheap zip ties. They tend to spend a few more dollars and get good, thick ones.
Unless you are well-practiced, these ties will foil your attempts. It doesn’t take much to strip a few square inches of skin from your hands with these ties.
Secondly, there are many “professional-grade” zip ties or flex-cuffs available on the market. These are re-enforced with a thin metal strip. You will not be able to escape these with the body wedge method.

Last, but not least, the bad guys have perfected the art of making “Barbed Cuffs.” By adding a second cut off tie to the inside of the zip tie they improve their effectiveness 100%.
That is if you try to escape them this way the added barb will open up your wrists. Now you have two problems. Illegal restraint and hemorrhagic bleeding.
Don’t be dissuaded by this. You still have a powerful option. One that you need to prepare for though.
Zip ties being plastic are susceptible to heat. By using friction, you can cut through almost any ties. Kevlar string is perfect for this:
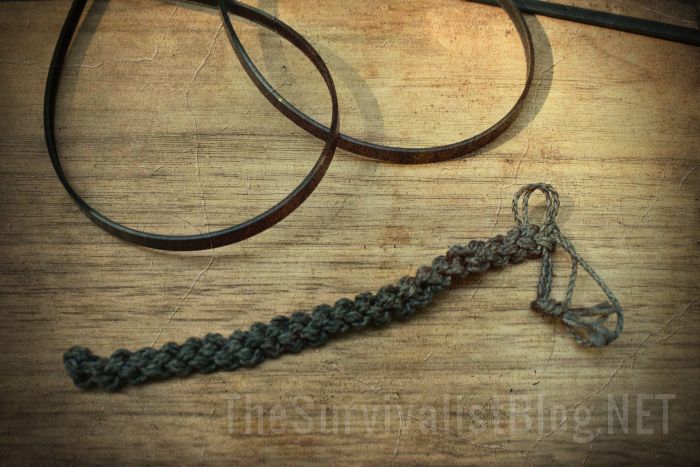
Hide on your person a length of Kevlar cord. You can find this as kite string on Amazon for cheap.
A single, or better yet, a double-strand is perfect for cutting through zip ties.
The technique uses your feet to create back and forth movement of the cordage. We were taught (and numerous YouTube videos also demonstrate) the technique of looping the two ends of the cord around your feet and bicycling. The Kevlar threaded over the zip tie cuts you to freedom.
Pumping your feet back and forth moves the Kevlar rapidly across the plastic tie. This melts the zip tie in a matter of seconds.
You can do this easily if your hands are in front of you or even behind you. If your hands are secured behind your back you are best off lying on your stomach or side while working.
When restrained with professional flexi-cuffs you must position the cord over the locking mechanism of the ties. It’s the only part without metal re-enforcement. Additionally, you can use this technique on duct tape as well.
Don’t position the Kevlar cord near your skin. You’ll burn and abrade your way through your skin faster than you will the ties. Again, this leaves you with two problems, restraint, and injury.
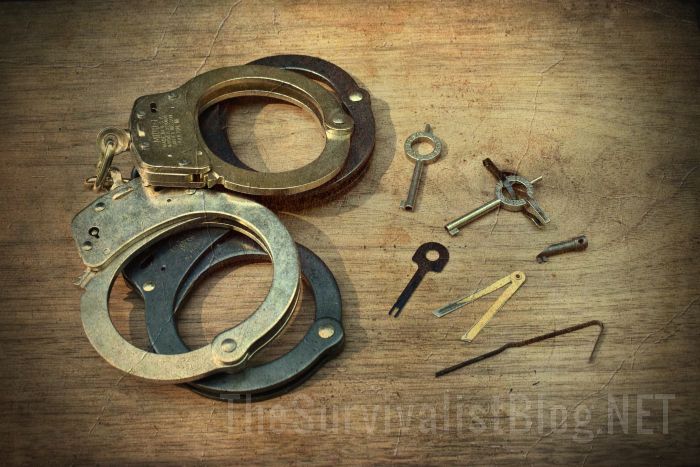
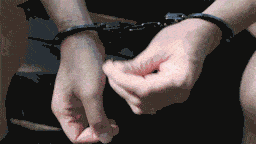
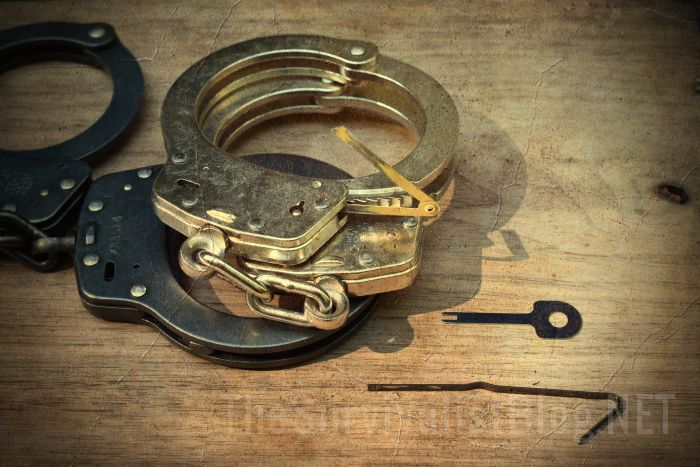
How to Escape Handcuffs
Halfway through the day we got to handcuffs. Good old fashion cold steel on skin. Add the unmistakable “click” of the ratchet and you are in for a wild ride when these come out.
Most handcuffs operate by a small ratchet that engages with the single strand teeth while it encircles your hands. The ratchet is disengaged with a key. Defeat either mechanism and you are free. It’s almost that easy.
The most popular handcuff in the United States is the Smith and Wesson model 100. Used by police and bad guys alike, you can have your very own pair for a reasonable price.
The key for the 100 is universal. More importantly, there are two ends to each key. The first end actuates the ratchet, disengaging it when turned. The second end sets the lock.
The ratchet allows the cuffs to be locked in a single direction. With each click, they get tighter. Criminals exploited this with bad intent.
They would tighten the cuffs on themselves to the extreme. They’d complain and the officer would have to uncuff the criminal to reset the tension. During this process, the criminal would attempt to escape or attack.

Smith and Wesson responded by adding a locking mechanism. Once the handcuffs are set to the proper tension, the lock is engaged. They can neither open nor close further until the officer disengages the lock.
To defeat handcuffs, you must first defeat the lock. This is best done with a key, real, or improvised. To engage the lock a small tab in the body of the cuff is “clicked” to the locking position.
To unlock the cuffs, the key is inserted and first turned until the lock is deactivated. The key is then turned in the opposite direction to disengage the ratchet.
Your best bet is to hide a complete cuff key, modified key, or improvised key. This will be the simplest method to escape.
Your second option is to shim the handcuffs. A shim is a thin strip of metal that slips between the single strand teeth and ratchet. Once the shim is in place, the shackle slides open.
Shims are easy to improvise, as you can use any strip of thin metal. The best option is a piece cut from spring steel.
A strip about 1/8th inch wide and 1 ½ inch long is all you need. Spring steel is available at some big box stores and hobby stores. You will need to cut and file your raw spring steel to an optimal size and shape.
The next and more readily accessible option is bobby pins. Cut the straight section from the pin and snip off the first ¼ inch. You will most likely need to sand off any coating.
This coating binds on the teeth of the ratchet and makes the shim a little too thick and sticky for my liking. The good news is that you can bend a bobby pin to give it a little handle for a little extra force.
My favorite approach is to use a hair clip. Specifically, I prefer hair clips from the dollar store. Pick up the ones with a plain coating. Don’t get the ones that are all flowery or painted bright colors.
The flat matte colors are the thinnest and work the best. Snip off the fat end. Leave the end with the rivet.
You will then have a perfect set of two shims rivetted together. You can even use the hole through the rivet to tie a short tether (like a length of your Kevlar cord).
If you cut each end on a slight angle you’ll have a small wedge that will guide the shim into the hasp with ease.
When cuffed and using a shim, apply the shim to the cuff opposite of hand operating the shim. It’s easier and you won’t have to bend your wrist as much.
Once the shim slides into place you will need to advance the single strand one or two clicks. You must have the shim in place before you attempt this.
Each click you tighten the shackle is a click you will not get back. If you mess this up you just made the cuffs tighter and limited your options.
When the cuff is shimmed and you tighten it will pull the shim into the shackle and depress the ratchet. This draws the shim in further and separates the ratchet teeth from the shackle teeth. Now you can back off the shackle and gain your freedom.
Regardless of your chosen method, I highly recommend tethering your key. Use a length of string or Kevlar cord. If you are kidnapped and bound, you can guarantee it will not be in a comfortable position.
Likewise, your mobility will be limited. If you drop a tool it is not likely you’ll be able to get to it.
Handcuffs are serious elements of bondage and restraint. With a little knowledge, you minimize the shock and awe of this mode of restraint. With a little practice, you can prepare yourself to counter your attackers and improve your survival position.
Travel Preparations
Your counter custody measures should always begin with travel preparations. First is your site survey. Generate a binder for your destination. Include maps of hotels, visit locations, and emergency services. Who are the local good and bad actors? These days it’s not always obvious.
Conduct a social media search on the tools and techniques used by the bad actors and prepare a contact list of the good ones. Are the local bad actors professionals or wannabes? Do they show signs of advanced techniques or are they in for the quick ransom buck?
Next research the regional handcuffs. The Smith and Wesson cuffs I reference are prevalent in the United States. This is not true for Europe, Asia, or Africa. If you will be traveling outside of the US then study up.
If the threat to you is serious, or you just want to increase your skillset, buy a few different brands that are prevalent in your AOI. Understand the ones you are likely to encounter and learn how to defeat them.
Also, keep in mind that some border crossings consider handcuff keys grounds for detention and questioning.
Your site survey needs to prepare you for what you may encounter when the day goes south. Only with this knowledge can you push the escape odds in your favor.
Wrap-up
I’ve spent a long time learning about survival. Improving my level of preparedness. Sharing prepper facts and knowledge. I am constantly improving my chance of survival no matter the circumstances.
Most recently my focus has changed from the world at large to a more personal approach. Considering my job and my travels I have decided that it is prudent to gain a new set of skills.
While I don’t expect being kidnapped for ransom anytime soon, I also don’t expect to have a car fire. That being said I keep a fire extinguisher in my car.
Mastering skills to thwart illegal custody is just another means for covering the corner cases in your threat matrix. You never know when you will draw the wrong kind of attention. Be prepared by learning to escape the most common restraint methods.