Even when we have a specific goal / destination in mind, sometimes we can just “row our boat in circles” as it were if we don’t have steps to reach that goal / destination. The order in which we take those steps is important too. Doing things in the wrong order can be a waste of time. We need to do the most important things first.
Where to Start?
Hopefully by now, you know what you should be preparing for. You should have a list of 3-6 “disasters” that are most important for your family to be prepared to handle. If you haven’t done that yet, go back to week #1 and use the worksheet and three simple steps I gave you to figure it out.
Now that you know what your goal is, you need to figure out where to start What do you need to do, learn and buy in order to reach that goal?
Three Lists
Make three lists! (I guess I like the number three!)
These are very common sense lists to make. In fact, these are the same three lists that Angela from Food Storage and Survival is encouraging her readers to make this month. She is nicer than I am though. She is giving her readers a full month, while you only get a week! She has some great tips about prioritizing in that post as well as in this post: Four Questions to Ask to Prioritize Emergency Preparedness Goals. I encourage you to check them out!
Lisa Bedford, The Survival Mom, also includes these same three lists right at the beginning of her book, Survival Mom: How to Prepare Your Family for Everyday Disaster and Worst-Case Scenarios.
These three lists are simple, but important:
1. To Do
2. To Learn
3. To Buy
Now, you might think….“but I’m just starting out! I don’t know what to put on those lists!” There is no need to stress! These are fluid lists. They can, and should change over time as you learn more. This first time creating these lists should just be a major brainstorming session. Simply write down everything you think you might need to do to get ready for those 3-6 disasters on your list. Involve your spouse and teenage children if they are willing.
Tips
Still stressing? Calm down! I’ve got some tips to help you out:
- No idea is too big or unrealistic or too small or insignificant. Add them all. That is what brainstorming is all about. You will prioritize later.
- If some of your ideas are pretty long range, break them down in to smaller steps.
- No matter the disaster, there are really only two scenarios you need to worry about: evacuating or staying put. Would you be more likely to evacuate or stay put following / during your 3-6 disasters? That will affect what you put on your lists.
- Think of each of the following categories as you add to each list
- Water
- Food (including how to cook it)
- First Aid
- Finances
- Sanitation
- Safety and Security
To Do:
This list should be full of the things you can do to help reach your goals. Most of these should cost no (or very little) money. What do you want to get DONE before your 3-6 disaster happen? Tasks like organizing all your important documents or taking an inventory of the food you have, or securing the water heater to the wall should be on this list.
To Learn:
Oh, this list can get quite long, but the things on this list can be powerful! Include both skills and knowledge that would help you and your family in your 3-6 disaster situations. Things like learning how to cook with food storage or learning how to knit or how to use a sun oven should be on this list.
To Buy:
Remember, you will prioritize in just a minute! For now, just have fun and create a wish list! What items will you need / want during your 3-6 disasters? Once you’ve created this “wish list,” do three things:
- Make sure you check closets and cupboards: you may have forgotten that you already have some of these things stashed away!
- Look at each item and determine if you could make it yourself. If you had the knowledge, skills and time, could you save yourself some money? Be careful though, you want items and products you can rely on in times of disaster and stress. Don’t sacrifice that quality!
- Look at each item and decide if there is a more cost effective option that would work for you. Again, sometimes the more expensive items are worth it, but not always. Sometimes a less expensive item will do the job although it may take a little extra work from you.
You should keep this list with you! Prioritize it first (see below), but once you have it ready to go, keep it with you! That way, if you happen to see one of your top items on sale or at a 2nd hand store for crazy cheap, then you can pick it up and cross it off your list. This list will keep you from just randomly buying things in a panic. Don’t get too strict though! You can buy item #5 before item #1 if you find it at a crazy price. Just don’t buy item #50 before item #1!
Prioritize:
Alright, now that you’ve created your lists, it is time to prioritize. Both time and money are valuable and you want to spend those resources on the most important things first. This exercise is similar to the one you used to find the 3-6 disasters you are preparing for. For every item on your list, rate it on a scale of 1-4 in the following three areas:
1. Will this skill, knowledge or item keep me and my family alive?
- 1 = It is a convenience only
- 2 = It would keep life more “normal” and reduce anxiety and stress
- 3 = It is likely that it would or could
- 4 = It is absolutely essential to live
2. How long will this item, knowledge or skill take me to learn / do / buy (this has to do with how expensive it is)?
- 1 = More than a year
- 2 = Six months to a year
- 3 = Two to Five months
- 4 = A month or less
3. How excited are you about gaining this knowledge / skill, doing this task, or owning this item?
This one may come as a surprise, but I’ve found that tackling things you don’t enjoy before those you do enjoy can provide the necessary motivation to accomplish them….because you want to get to those things you ARE excited about! However, I don’t feel this category is as important as the others, so you can’t rate anything at a “4”
- 1= I’m very excited
- 2 = I’m indifferent
- 3 = I’m dreading it
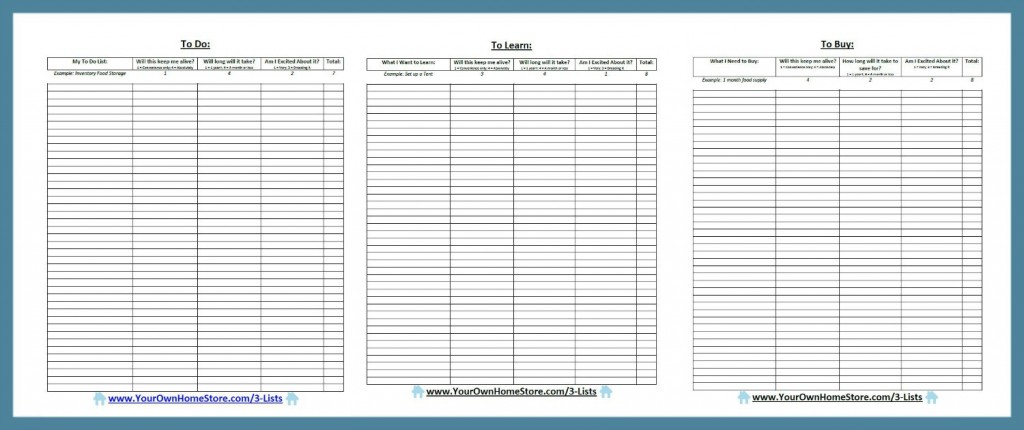
And once again, if it is helpful, I’ve created a printable to help you with this. Simply click HERE or on the image below to download it:
One Last Reminder
Remember, the lists you create today are just a starting point. Put them in your purse or car. Keep them with you. As ideas come into your mind, add them to the list. You will likely NEVER have an empty list, but keeping it in the forefront of your mind will help you stay focused on what is most important.
Pin This Now To Save For Later:
Becky is a wildlife enthusiast and pet and livestock care expert with a diploma in canine nutrition. With over a decade of experience in animal welfare, Becky lends her expertise to Simple Family Preparedness through insightful info about pets, livestock, bee keeping, and the practicalities of homesteading.


I live in an independent living facility that is govt. funded & we are very limited as to what we can store. A neighbor actually got wrote up for too much stored goods as a fire hazard. I’m adding to your 3 lists by making a first aid/medical list as a stand alone. I have a very disabled grand daughter and there is a lot that we must be aware of. I’m thinking to vacuum seal most of those supplies to keep them sterile & fresh. Any suggestions for this idea?
I would guess that would help Michelle though I’ve never done so before!
Michelle and Misty,
I vacuum seal a lot of my preps. Many items in my go bags are sealed. Cloths ( extra socks, wicking / thermal undercloths, even things like my emergency sleeping bags) It keeps things dry, and fresh. My go bags are much smaller, but I make sure to have extra room in them for when I “unseal” them for use.
My husband and I have already done most of the things that I put on my list (water storage, food storage, home security, personal security, first aid training and supplies and financial security) but I have not done updated inventories of my food supplies and first aid/medical supplies in the past 6 months. I am dreading doing this at about the same level of doing next year’s document gathering for federal tax filing. I enjoy dehydrating food and the other things that improve the food storage and first aid/medical supplies, but have not found any way to put the fun in inventorying my supplies. On the up-side my husband and I completed Citizen Emergency Response Training (CERT) last weekend and each received a really thick CERT manual full of information plus a backpack filled with emergency gear (hard hat, leather gloves, gas turn-off wrench, etc.) to use if we are asked to respond to a local disaster.
Wow Linda! You are and inspiration! Way to go! And good luck with that inventory. It can be a major project! Do you have in first in first out shelves? Those help me a bit.
I don’t really do any kind of “first in, first out storage” system because I try not to store “wet” canned goods or other typical grocery store-type packaged foods that are good for 2 years or less. The exception to the self-imposed “wet” food ban are my boxes of cans of Yoders bacon, sausage and hamburger as well as a small amount of commercially canned glass bottles and jars (with metal lids) of fat-free condiments and sauces. These all already have either “best use dates” or I have written purchase dates on them. These condiments and sauces are located in one area and I make sure I use them before 2 years are up. My #10 cans of dehydrated or freeze-dried foods are individually dated based on the month and year I purchased them. The home-dehydrated foods I have vacuum canned have the month/year of canning on their individual homemade labels (painter’s tape and Sharpie marker) and the canning jars are stored in their original cardboard boxes/flats with a list of contents taped to each box. These boxes of vacuum canned goods are stored on stainless steel baker’s shelving in a darkened, air conditioned room. It’s a simple matter of scanning the lists on the boxes to find which box contains a jar of the dry food I want. I use from my vacuum canned storage each week and check the seals on all the jars every few months. None of the vacuum cans is older than two years, so haven’t yet discovered anything that has lost its color or flavor. The bulk grains and pasta, purchased in 25 lb bags, have all been frozen a minimum of 72 hours before being transferred to food-safe buckets and are stored in the same dark, cool room.
Love this, don’t understand the ranking’s total, though – perhaps to help me prioritize!. Can you please correct the “Will long will it take” Heading. Love your passion and help! Thanks so much for making this and helping us to push on.
The toughest disaster for us to prepare for, and the most important- is preparing for wildfires. With the drought, and us living at the edge of a pine and juniper forest. I’ve got the evacuation part pretty well taken care of (we had to evacuate last year as well, and Learned A Lot). But I’d also like to make our property a lot more fire resistant, (I would hate for a fire to come through and make all my food preps inedible!) and it looks like it will take a lot of money. I decided to store at least some of my food and water in a storage unit some distance away so that if fire swept through we wouldn’t lose ALL of it, but I’m also aware that the storage unit is NOT climate controlled (don’t have ’em in our area) so I am planning on hauling it all back to the home when fire season ends. If you have any suggestions on how I can do things a little more easily, I’m all ears.
Wow. That is a tough one! I may just leave it in the storage unit, but rotate it often. Obviously, it depends on what you are storing, but for every 10° above 70°, you cut your shelf life in half (approximately). So, for high quality freeze dried foods, you’d have a 25 year shelf life at 70°, a 12 year shelf life at 80° and a 6 year shelf life at 90°. Even at 100°, you’d still get 3 years out of it. Canned goods are tougher though. Most have a 2-3 year shelf life to begin with, so at 90°, you should be trying to rotate through them every 3-4 months. But that is still do-able. Just make sure you are storing things you actually use and then go “shopping” in your storage unit once a month. Rotation is key!
Muriel, how did it go for you these past three years??
I started working on lists a couple of months ago.
For some reason only some of my comment actually posted?
I have a list of things to buy on my phone.
I forgot that since I have 2 goats that will be giving birth by mid February that I need to learn about kidding and milking them. We just added animals to our mini farm last year so we still have a lot to learn
Sounds like an adventure!