A 55-gallon water container can be a great way to store water for your family in case of water storage or contamination.
There are other options as well, but this is a common and convenient one.
However, even with these barrels being so common, it seems many people are a bit intimidated by them. Many are unsure of the best way to fill up a 55-gallon water barrel and how to keep it stored safely.
So, I thought I would try and make it easy and guide you through all the steps!

How to Fill Up a 55-Gallon Water Container
Below are some simple steps to filling up your water barrel.
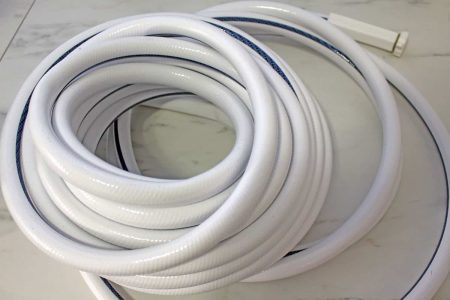
Choose a hose
In order to fill up a 55-gallon water barrel, you will definitely need a hose.
Option #1 – You likely already have a garden hose, but if this hose is kept outside and is well used I would not recommend using it. A hose that has been sitting around outside can have dirt in it. We need to make sure we fill the container with perfectly clean water. If you have a hose that has been well cared for and kept indoors and is relatively new, it should be safe to use. Run a test in a clean white bowl or container and see if the water looks clear and clean.
Option #2 – Purchase a new garden hose. This would be my preferred recommendation! Using this will better to ensure your water is clean when it goes in to the container.
Option #3 – A drinking water hose (a.k.a. a boat and camper hose). These hoses are specifically made to handle drinking water. They cost a bit more but are the best hose you can use to fill up your 55-gallon water container. You can find them at home improvement stores or on Amazon.
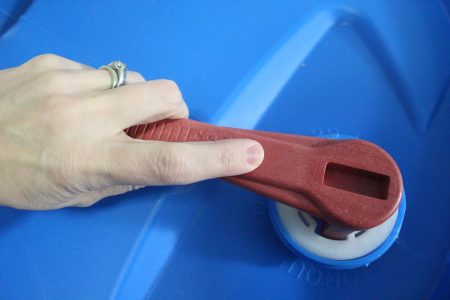
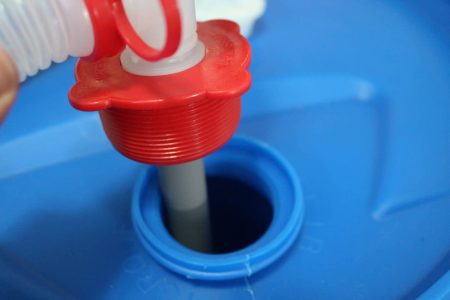
Open your 55-gallon water barrel
Seems like an obvious step, right?
Well, the thing is that the lid to a 55-gallon water barrel is a bung. It looks like this:
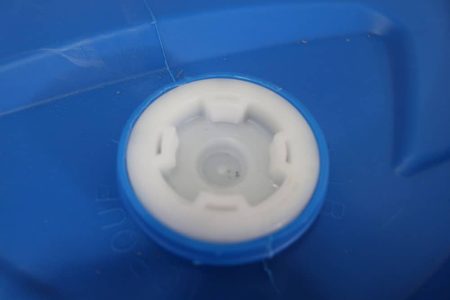
To open that bung to fill up the water barrel, you will need a bung wrench. This bung wrench on Amazon is typically the type you will need to get but make sure you get the right one for your specific container. You may be able to find them at your local supply stores as well.
Place the bung wrench into the container as shown and turn. It will probably be really tight, and will need to be closed tight as well after you fill it.
Clean your 55-gallon drum to store water safely
Now that your barrel is open, the first thing you should do is clean it thoroughly.
Below are the steps to use to make sure it is clean and safe to store your water.
- Pour about 1/8 cup of bleach in it, a little more or less is fine; this is not an exact science
- Add a few gallons of water
- Put the bung back on and close it with the bung wrench
- Roll your barrel around so that the entire inside gets covered with bleach water
- Open the barrel and dump out the bleach water in a safe place, like a drain
While using bleach to clean your container is optional, I highly recommend it to ensure you are drinking the safest and cleanest water possible.
Move the water container to its permanent spot
Now, before you actually fill up your 55-gallon water container, you will need to take it to where you want it to be permanently.
A full 55-gallon water barrel weighs close to 500 pounds, so you are not going to want to move this sucker when it is full.
Do your best to keep it somewhere cool, dry, and dark. If you can’t meet all those requirements, you can still fill it up, but you may want to rotate it or move it around once in a while.
You could also put a piece of plywood under it as some people worry about chemicals from the ground leaching in. Personally, I don’t believe that to be necessary, but it certainly can’t hurt.
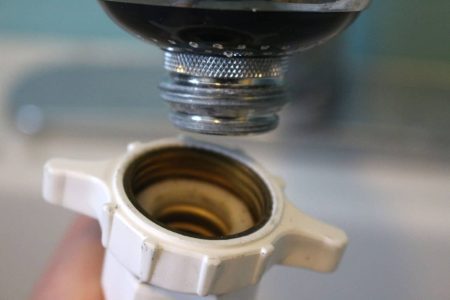
Attach a hose to your faucet
Attach your hose to a faucet to fill up the 55-gallon water container.
There are a few options here:
Option #1 – Attach a hose to a potable water source outside. We have an outdoor water source that provides potable water and others that provide irrigation water. You DO NOT want to fill your 55-gallon water barrel with irrigation water.
But if you have a potable water source outside – use that. Depending on where you are keeping your barrel, you may need an extra-long hose. Put it through an open door or window and then inside your open water barrel.
Option #2 – Attach it to an indoor faucet, which is the option I personally use.
Since we keep our barrels in our basement under our porch, I can use a shorter hose that runs from our kitchen faucet.
Some faucets are already made to be attached right to a hose, others will need an attachment or converter. Just let your friendly home store employee know what you are trying to do, and they will help you find the right attachment.
Fill the 55-gallon water barrel
Finally, it is time to fill up your water container.
I would suggest you have the hose pretty far down inside the barrel. You may also want to have a second person standing there when you turn the water on just to make sure that the sudden pressure doesn’t cause the hose to come out of the barrel.
Once it is started, you can leave it for a while.
Make note of the time and then come back after a few minutes. You can use a flashlight to see how full it is, then estimate how long it will take to get full. This should give you an idea of how long you have before you come back.
Add a water treatment to the water
Once you have completely filled up your container, you should add some sort of water treatment.
Adding a 1/4 cup of bleach will make sure that any bacteria that might have sneaked in during the filling-up process are killed. But this will also change the taste of your water.
Since bleach has a short shelf life, you should rotate it every year or so–less often if it is in a cool, dark, dry place, but more often if it is in the sun or a hot garage.
You can also use chlorine dioxide. My favorite brand is Aquamira.
Using this guarantees you a 5-year shelf life – so far less rotation is needed than just using bleach! An added bonus is that your water won’t taste like bleach either.
The downside is that it is more expensive than just using bleach.

Close the water container
Use your bung wrench to close up that bung tightly. Make sure you have thoroughly tightened the bung so no elements, bugs, or dirt can get in.
What I learned about having a water container
I got my first 55-gallon water barrel sometime in 2009.
I was so excited and proud that we finally had significant water storage. We were in California at the time, so there were no basements, so it sat out in the sun on our back porch.
Moving with a barrel
Then the time came for us to move, which made me think about how I was actually going to get the water out. Remember, it weighed nearly 500 pounds. I am strong, but not that strong. There was no way we could move this to Utah full.
When we realized we needed to empty it, we did not realize how much effort would be needed. It took three men to push the barrel over and dump all the water out.
So, if you plan on moving, be sure you have resources to help you!
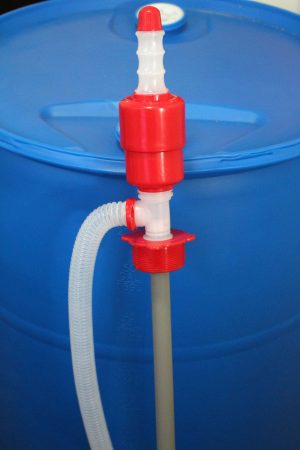
A pump for getting the water
So, I got the barrel, but did not think about how I needed to get water out.
I realized I needed to have a pump to get water out of my 55-gallon water barrel in a way that I could actually use it – not by spilling it on the ground.
You can find pretty inexpensive pumps at most home improvement stores or on Amazon.
This siphon pump is affordable and works well. You pump it a few times and the water continues to come out without you pumping anymore until you stop it.
I actually have two in case one breaks. Yes, I am always prepared.
So, there you have it! Everything you need to know on how to fill up a 55-gallon water container.
Just one of many ways you can become a smarter prepper and be more prepared for that next emergency.
Let me know what you think about my strategy on how to fill up a 55-gallon water barrel and if you have further advice. Don’t hesitate to share your ideas on this topic and even all your questions and curiosities!

Becky is a wildlife enthusiast and pet and livestock care expert with a diploma in canine nutrition. With over a decade of experience in animal welfare, Becky lends her expertise to Simple Family Preparedness through insightful info about pets, livestock, bee keeping, and the practicalities of homesteading.
I have the 55 gal. water barrel that I purchased from Emergency Essentials, and have had it for a few years now. I am not pleased with this particular Water Barrel as it is not easily emptied and cleaned out. The top doesn’t come off, only the two small bung openings are available to open. This makes extremely difficult to change the water or to utilize the water efficiently. As they point out when it is filled it weighs at least 300 plus pounds. I have mine on a rolling coaster but it is still almost impossible to really utilize this for a source of drinking water. It would have been better if the top was able to unscrew and the entire top come off. So if you are a woman of 76 plus how do you roll around a barrel like this every two years. This is a poor design. I am sorry I bought it. I also have a barrel approx. 15 gallons and the top does come off. It is much easier to fill and clean. When I have a chance I will get rid of the huge 55 gal. barrel and replace it with smaller ones that are just as sturdy and much easier to fill with filtered clean water and utilize.
Great clear, concise post that allowed me to do this the right way! So far I have a 2 month supply for my family and am looking for more. Much to the chagrin of my GF!
What do you mean by rotate the water. Is it simply shifting it around (500lbs worth) so it mixes up a bit, or is it refilling it completely.
How many tablets for each 55 gallons of water? Put the tablets in when filling up the barrels?
How much water do you need per person? Is one enough for 2 people?
I have the exact two barrels, also have the need to move them around in my safe room on occasion so I built a very simple platform to put them on with wheels so they can easily be moved. If interested I can email you a pic of them.
Great website.
So smart Eric!
Thank you so much… it seems simple, but it’s nice to have the step-by-step.
Do you have anything similar for emptying a 55-gallon barrel? We’ve got 4 barrels sitting in the basement, filled 12 years ago, and I’m thinking we really need to empty and refill, but I’m afraid of flooding everything. I’ve got the siphon pump you mentioned, 1 or 2 of the special hoses you mentioned, and two 6-gallon jugs. What’s the best way to do this? I’m afraid we’re going to be endlessly lugging jugs of water up and down the basement stairs all day. The barrels are just below a window, which opens to a window well in the backyard, next to the hose spigot. Is it possible to somehow have the water flow upward through a hose and out into the backyard?? Thanks for the use of your brain! 🙂
You can get it to siphon up and out your window as long as the bottom of the hose is lower than the barrel – so if you are on a hill and can somehow make the bottom end lower than the barrel it should work. You could also just add the Aquamira and it should get rid of anything in there.
Harbor freight sells a very inexpensive ac pump to empty the water barrel and fairly quickly
I have heard that hydrogen peroxide is a good disinfectant but can’t find any info on how much. (Doesn’t leave a bad taste like Clorox ). Do you know amounts?
That is not something I’ve heard…sorry.
I also have 55 gallon barrels to deal with. I bought the larger furniture dollies at Harbor Freight and put a board across the middle with blocks underneath for balance in case it tried to tip while moving them. The boards are a few inches longer than the dolly is wide. Simple piece of 2×4 wood underneath each end of the board. Blocks do not touch the floor. The dollies are rated at 1000 pounds. Does the job just fine for a very senior women. I also use these same dollies under all my shelf units of food storage. They work great. Can easily move shelves to clean under them. Everything is in the basement but still need to clean.
Great write-up, simple and concise.
Thanks!
This is definitely the most practical advice I can really use!
Yay! Glad to hear it!
Thanks a lot for the feedback! It is really nice to hear from you all!
Emergency Essentials sell steel barrel caddies that have casters on them to allow for movement, makes filling your barrels easier by being able to move them closer to the water source. And eliminates the need for wood since the barrels are already raised up off the floor. I have purchased several and they work really well. The casters have a lock on one wheel so that once in position they won’t roll around.
Thanks Judy!
Put the water treatment into the barrel before filling it with water. The turbulence of the stream of water will help mix it thoroughly. Remember to vent the barrel , the water being removed through the spigot must be replaced by air so the water will flow out or your barrel will collapse. Cleanse the spigot and surrounding area before use. Keep plastic barrels in a very dark area or cover them completely with an opaque material. The smallest amount of sunlight will facilitate the growth of algae. Agitate the water periodically by shaking the barrel. This will help keep it aerated and re-disperse any treatment chemicals. Always rotate stored water on a regular schedule. Stop the spread of disease and contamination by not allowing any activities like brushing teeth, shaving, bathing, washing clothes, washing dishes etc. near the water storage.
Instead of pushing the barrel over you should have siphoned as much out as you could and then push it over to get the remainder out. When you buy an RV water hose go ahead and purchase one of the inline water filters as well to filter out any particles that are in the water which seems to always be the case.
The problem was I didn’t have a siphon. haha
Thanks for all of the helpful info. Would you mind to please suggest a good resource to actually get a water storage barrel? Sorry, maybe that’s obvious and I just haven’t found one yet. Thanks again!
Jo
Emergency Essentials is a great place: https://bit.ly/2F4xnL3
When filling the barrel, do you fill it right to the top, or just to the 55 gal. mark? Ours are stored outside and it gets below freezing in the winter so I wasn’t sure if I needed to leave room for expansion if/when the water freezes.
We just got a soft water treatment system from Costco and the Spicket I would use to fill up my barrels is attached to the house so it will probably be soft water. Any suggestions? I do, however, have one hose in my garden area that we will have hard water. I could possibly use that if I were to get two long hoses and attach them together. I have no other place to put the water barrels except on the north side of my house near the house spicier. Don’t really want the added expense of another hose.
Why wouldn’t the soft water work?
Great help. We have discussed filling our water barrels, but have never done it yet. This makes it easy. NO guess work. Thanks so much.
You are welcome Sandra!
You are very welcome, Sandra Johnson! I am super happy to know I helped you all!
You could also just siphon the water out, Get a hose at least twice as long as the barrel is deep, put your thumb over the end of the hose, to keep the water out. Jam the hose down to the bottom of the full barrel of water, put the end of the hose with your thumb on it down near the ground and take your thumb off. The water should come flowing out and will continue to flow until the barrel is empty, or you get air in the hose.
Thank you! Thank you! Mine are sitting out there empty because I never know how to take care of the water.
You are welcome Corrie!
I got those tablets for water treatment. The instructions say one for every 2 quarts. This may be a dumb question but should I just follow that or do you use a different specific amount?