A fingertip cut is one of the most common types of wounds.
Most of the time, these small cuts aren’t serious, but you always want to make sure it is OK.
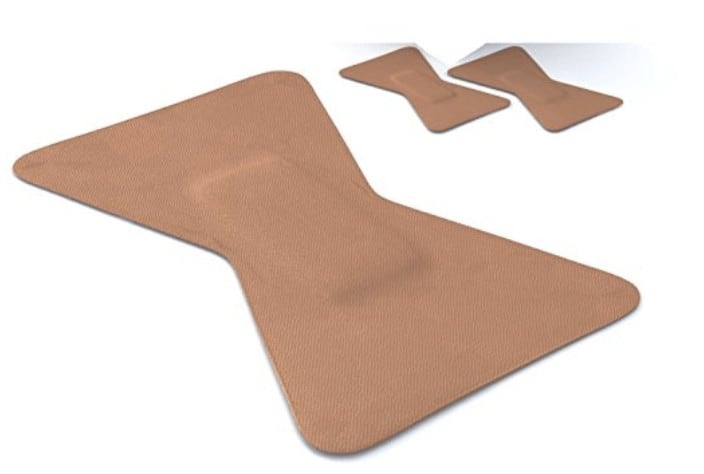
Fingertip cuts can be tough to treat using regular-sized bandages, which is why you should go for special fingertip or butterfly-shaped bandages. These can also sometimes be called wing or hourglass bandages too.
But, I am here to tell you that you can always turn a regular bandage into a fingertip-specific bandage in a few short steps. Below we will cover it all for you so you can save some pennies and be ready if you need to cover that boo-boo on the top of that finger!

So, let’s go over what all this means and how you can make your own.
When do you need fingertip bandages?
Although butterfly or hourglass-shaped fingertip bandages are available in most first aid kits, you might not have these shaped bandages around when you need them.
You may think it is impossible to substitute a regular-size bandage for one of these, but you can certainly try. But consider using a proper size according to the size of the cut.
Not to mention that, as you do your daily tasks, a regular-sized bandage can slide or fall off your fingertip. Therefore, this can cause more pain and prolong the healing process. That’s why many people buy small wing or butterfly bandages, or just make their own using larger bandages.
You can keep a regular-size bandage from falling off your finger with these DIY hacks. There are a few different ways people reconfigure their bandages to fit better. So, we thought of compiling a few methods in this article. We hope this will somehow help you. Check out also this Free First Aid Kit Checklist that will seem helpful to you.

How to Make DIY Fingertip Bandages
When you have regular bandages around the home and you cut your finger, it is best to improvise rather than use the entire item. Also, keep in mind that kids usually require a fingertip bandage more often than adults, because of their tiny fingers. It’s also important to teach your child some first-aid skills for children.
So, it’s always better to cut down and wrap regular-size bandages into fingertip versions for kids or adults. If you do that, you’ll save yourself some money and also avoid waste. Here are a few ways to do that.
The Triangle Method Fingertip Bandage Hack
Rinse a small pair of scissors in disinfectant (alcohol) to ensure cleanliness. Take the scissors and make a triangle on the long sides of a regular bandage. Then, cut the shape before you take out the covering over the adhesive. Keep the cushion in the middle as is, and wrap the flaps you cut out of the bandage around your injured finger.
If you have a full bandage, place it lengthwise along the back and front of your finger. The bandage sides will wrap around your finger. So that the bandages meet and stick, covering the finger.
The X Method for Fingertip Bandaid
You can also try the “X” method of fashioning a bandage to stay on your fingertip.
In order to do that, take a large or medium bandage out of the box. Cut down the middle of each side till you get to the pad. Then, put the pad over the cut, with the sticky part facing your nail and the strips crossing each other like an “X.”
On the other side of your finger, secure the two remaining strips around the sides of your finger. The second set of strips should overlap the first two strips to keep the bandage in place. This method improves on the wrap-around and over-thumb methods to keep the bandage in place longer.
How To Use Pre-Made Knuckle and Fingertip Bandages?
A store-bought fingertip bandage has a butterfly-shaped strip and a long white pad. It is usually made of cloth. The narrow midsection prevents the material from folding when the bandage bends back on itself.
When you place a pre-made bandage on an injured fingertip, the finger and the long side of the pad should face the same direction. Stick the bandage to the finger’s palm side (finger pad). Then, pull the bandage over the fingernail and make sure it is tight. Keep in mind that there should be no wrinkles on the bandage once it’s secured.
Also, make sure that the bandage is tight if the fingertip is bloody, but that it’s not tight enough that it cuts the circulation. Then, wrap another bandage around the knuckle. The second bandage will help secure the first bandage and add more pressure to the wound to aid healing.
Gauze as Fingertip Bandage
A bandage for your finger or fingertip that’s made of gauze, offers extra protection for cut fingers or injured nails or nail beds.
Many medical supply manufacturers make gauze finger bandages. These gauze bandages usually come with an applicator, since applying a bandage to an injured finger can be tough to do on your own.
First of all, you’ll need to cut the gauze to ensure that it will fit comfortably over the injured finger. It is usually about two and a half times the length of the finger. Then, take the gauze bandage and place it on the applicator. Hold the applicator and bandage over the injured finger. You should aim the open end of the applicator at the base of your finger.
Finally, use your thumb to hold the end of the gauze in place, and withdraw the applicator to the finger’s end. Now, twist the applicator 360 degrees. Apply the rest of the fingertip bandage by pushing the applicator back over the injured finger. Also, you can use zinc oxide, or a strip of medical tape to secure the bandage.
What to Do When You Cut Your Fingertip
First of all, don’t grab a bandage at the first sign of a cut fingertip. You need to assess how deep the cut is and try to stop the bleeding. Run your fingertip under cold water from your bathroom faucet to stop the bleeding. The cold water will help contract blood vessels, which helps stem the bleeding.
Always remember that even minor cuts may seem dangerous and ooze way too much blood at first. Remain calm and go through the following steps to determine if you do have a serious cut.
Apply Pressure First
If the cut is bad, apply pressure on the fingertip with a clean cloth or piece of gauze to stop bleeding. You may use the same process on a cut fingertip as you do when you have a tooth pulled. The pressure and gauze equal clotting and healing.
If the cut is bleeding profusely, don’t panic. Place more clean gauze over the cut and apply pressure till the bleeding subsides. Don’t remove the original gauze yet – it may displace any clot that has already formed.
Don’t put iodine, hydrogen peroxide, or Mercurochrome on the cut. Even though your Grandma may have used these substances on cuts, these home remedies may cause tissue damage.
Once the bleeding is under control, wash the cut with lukewarm water. Soap is optional. Also, use a mild soap if you must, and rinse it out completely before bandaging the wound.
Use a Fingertip Bandage
After you’ve washed the cut and let it dry, dab on some antibacterial cream, and put on a butterfly bandage. You can have a DIY version made with a regular-sized bandage. Check the cut, and put on a fresh bandage daily.
Also, keep in mind that it may take a few days to a few weeks for the cut to heal. However, the length of healing time depends on the depth of the cut, your age, and your overall health.
Precautions
Go to the nearest urgent care center or emergency room, if the cut is very deep or you have lost part of your fingertip. You also want to be seen right away, if the finger is numb or swollen as an infection or discharge can occur after a few days of cutting your finger.
How to Use Butterfly or Hourglass Bandages
Butterfly-shaped bandages aren’t exclusively for fingertip cuts. They can be used for any small cut. This type of bandage hastens to heal and reduces scarring. So, just clean and dry the cut. Then use one or more bandages at a time depending on the size and depth of the cut.
Apply the bandage to pull together both sides of the cut. Use additional bandages as necessary to make sure the whole wound is covered. Also, you should remember that butterfly bandages are sometimes called butterfly closures. That is why they keep the cut clean and dry until healed.
Dress a cut on the palm side of a knuckle with a butterfly-shaped bandage. The bandage pad is narrow enough to keep enough pressure on the knuckle’s underside. Thus, without bunching up when you move your hand. The wide parts of the bandage spread out over the top of the knuckle to prevent the bandage from sliding.
Moreover, using an hourglass-shaped bandage allows you to use your hand normally. When you have a cut on one of your knuckles, or a blister on your thumb, you can use a butterfly bandage.
There aren’t any obvious disadvantages to using butterfly bandages. If you opt to buy a box of brand-name fingertip bandages or butterfly bandages and only use one of them, you’re only out a few dollars (less if you buy a box from a dollar store).
The number one complaint about any type of store-bought bandage is how long it will stay securely on the wound. This is particularly during typing, housecleaning, and similar activities. The bandage needs to have staying power.
What Fingertip Bandage Is Best For You?
So, popular brand name or discount brand finger or butterfly bandages will fit your fingertip and stay secure for varying amounts of time. Whereas, bandages made by medical supply companies will generally have more sticking power. However, it is always your final call what items will you purchase and use for yourself and your family. Yet, please do not forget to share that products and brands with us in the comments section. We always love to learn the best from our devoted readers!
Also, all your further questions are more than expected in the comments section below as we desire to make this topic as understandable as possible. It is more than important to know how to take care of yourself, nowadays with all these viruses going around. So, keep yourself safe and well-documented!
Final Thoughts
Now that we have learned the basic information about the types of bandaids for fingertips, you might have an idea of what to use next by the time you’ll encounter similar situations.
If you have further questions, don’t hesitate to ask them in the comments section. Also, please share with us your experience with these fingertip bandages and how you use them. We are always super excited to hear from you! Read also about the 25 Emergency Preparedness Items I Get at The Dollar Store – Plus 30 More because it’s an important note you should know.
Moreover, you can learn many tips and techniques on how to become a wise and smart prepper. Try browsing our website to discover more tutorials and recommendations that will make you think you might need one. Or maybe you could have a direct interest in First Aid App and CPR and Choking First Aid Basics.
Becky is a wildlife enthusiast and pet and livestock care expert with a diploma in canine nutrition. With over a decade of experience in animal welfare, Becky lends her expertise to Simple Family Preparedness through insightful info about pets, livestock, bee keeping, and the practicalities of homesteading.

