Why know how to build a homemade cell phone signal booster? You are no doubt less than thrilled with the monthly costs associated with owning a cellular phone but just try and get by without one. When your phone is operating smoothly, and you have a clear, strong signal, it seems worth the expense. However, when you are struggling to get enough of a signal to make a simple call, it can be infuriating.
When do You Need a Homemade Signal Booster?
Unfortunately, when traveling a distance between cities, it may be understandable that you would have a weak or even non-existent signal. Yet, a surprisingly high number of cell phone customers complain that they frequently cannot even get a signal inside their own homes or from their workplaces. No doubt, you have from time to time, played hide and seek with the signal yourself: standing on a chair, crawling under your desk, hanging out the window, or even striking some kind of yoga pose.
Not to mention the moments when an emergency occurs and an urgent phone call becomes necessary! That is exactly why we thought it would be a thrill for all of our readers to learn how to build their own homemade cell phone signal boosters. Wouldn’t be?

How To Make A Signal Booster: 5 Hacks
You are probably aware that cell phone signal boosters are available commercially, but the cost can be significant. Amplifiers, repeaters, antennas, and even mini-towers are available, but definitely not affordable. In addition, most are not portable, so are only helpful in your home.
However, were you aware till now that you can actually build a cell phone signal booster yourself, using inexpensive items from your local hardware or electronics store, or even from your own garage? There are many variations of methods to build a DIY signal booster; several of them require simple changes to one or two of the supply materials. Let’s take a look at a few of them.

1. Tin Can Signal Amplifier
- Two 13-oz coffee cans, metal cookie canister, or similar (soup-can size is too small);
- Antenna connector;
- Heavy-gauge copper wire;
- Pigtail connector compatible with your cell phone model;
- Soldering gun;
- Solder;
- Cell phone.
Step 1
Wash and dry the cans thoroughly. Remove any paper wrappers or labels from the exteriors. Leave one end intact on one of the coffee cans. Cut both ends from the second can in order to form a tube.
Using a heated soldering gun, carefully solder the open ends of both cans together to form one taller can. Remember to heat the area to be soldered for a moment with the tip of the gun before adding the solder. As an alternative, you may choose to use adhesive-backed copper tape (metal tape, not paper) for this step, straddling the join between the two and sealing the tape to the metal on each side as firmly as possible.
Next, using a utility knife or tin snips, cut a round hole 3.75 inches up the side from the closed bottom. Measure the neck of the antenna connector to determine how large the hole needs to be.
Step 2
Attach a 3-inch length of heavy copper wire to the antenna connector by pushing it firmly into the end. Solder copper wire in place, as taping with masking or duct tape will dampen the effect. This forms the antenna.
Push the finished antenna connector with copper wire attached through the hole on the outside of the can, just until the shoulder of the antenna connector reaches through to the inside of the can. Reach inside and place the nut on the shoulders of the antenna connector and tighten it into place. If you made your hole too large, you might need to add washers to complete this part.
Step 3
Now that the antenna array is complete on the inside, screw the pigtail connector onto the end of the antenna connector that remains outside of the can.
Plug the other end of the cord on the pigtail connector into your cell phone’s antenna port. The other end of the pigtail connector should fit into your phone’s charging port. Plug the unit into your phone, and it is ready to use. Just aim the open end of the can in any direction until you get a strong enough signal to make a call.

2. Twist Tie Signal Booster
A simple and effective way to boost your phone’s signal involves using twist ties (just take the ones off the bag of bread – longer ones work the best.) This works for cell phones that have an antenna stub and literally takes about 30 seconds. Starting at the lower end of the stub, wrap the twist tie around it a couple of times, leaving an inch or two of length protruding beyond the end of the stub. This essentially extends the antenna, increasing signal strength and stability. Tape the wrapped end in place to secure it.
3. Mini External Antenna
You can also use any slim metal tube such as a pen casing or metal drinking straw to form an external antenna. Tape one end near the top of your cell phone so that the tube extends upward from the phone. Plug your cell phone into the USB charger and wrap the cord around the metal tube. Clip the end with a metal spring clamp. You should see an increase of one or two bars in signal strength.
4. Homemade Signal Booster That Works: Internal Antenna Extension
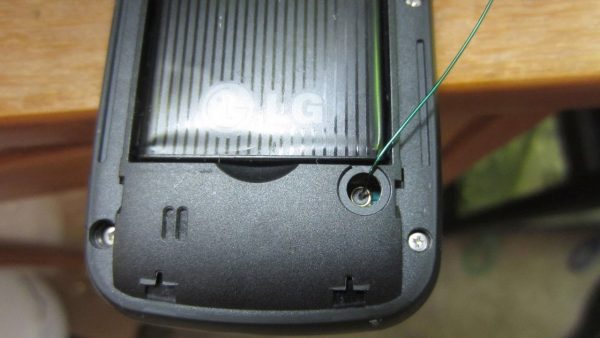
For this homemade cell phone signal booster, start by sliding the back off of the phone. Access the internal antenna port. Using insulated magnet wire, remove about ½” of the insulation from one end using a nail file or sandpaper and gently insert the stripped end into the antenna port. Cut the wire to a 6.3” length (1/4 of a wavelength) not including what is inserted into the port. Bend the wire over and tape it into place on the back of the phone. Run the wire up to the top of the phone and extend it as an antenna. Replace the back, allowing the wire to stay in place.

5. LauC2 Antenna
This last method is a bit more involved but is completely non-invasive to your phone. Most of the supplies can be gathered from within your home or from a hardware store.
This is all you will need:
- Two-wire coat hangers (must be ironed)
- Two 20A cable connector blocks
- Coax cable or TV cable
- Wire cutters
- Pliers
- Phillips head screwdriver
- Flathead screwdriver
Step 1
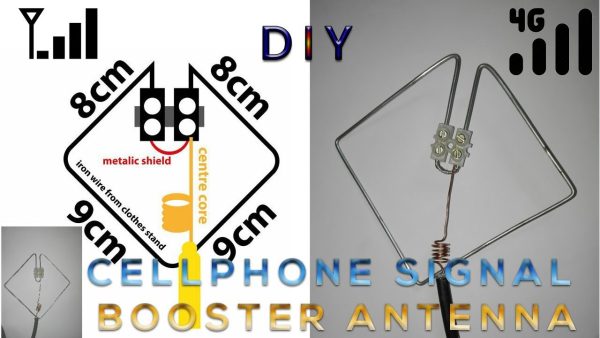
Begin by straightening the coat hanger and cutting it to a length of 42 cm. Using sandpaper, remove the paint or coating from the ends 4cm up. Now you are going to make a square with one open corner. Bend into a 90º angle at the center point. Measure 9cm from the center on each side and make a 90º bend at each mark (keeping in mind you are bending into a square). Measure 8cm on each side and bend at 45º toward the center of the square. Bend the remaining 4cm on each end into the center of the square, parallel to one another. Insert into the openings on one of the connector blocks.
Step 2
Next, you will need the coax cable. Remove 20cm of the insulation and woven metal shield to expose the bare wire. Save the metal shield. Wrap the end of the exposed wire just above the intact section of cable around a pencil for five full rounds to create a coil. Insert the other end into the open end of the connector block and tighten it in place. Twist the reserved metal coil tightly to form another wire. Insert one end into one port on the connector block. Insert the other end into another port.
Step 3
Repeat the entire process to complete a second unit, using the other end of the coax cable to connect the two units. This time wrap the bare wire around the pencil for seven full rounds. You should have two square wire units with connector blocks and coils in the center and connected with a coax cable. You now have a finished LauC2 antenna.
Step 4
Place one unit outdoors in a high open spot, like on the roof, and run the cable through a window, avoiding window screens or metal trims. Place anywhere that is convenient. This should increase your cell signal by 2G or more. You may need to move it around a few times to find the optimum placement.
Now you see that building your cell phone signal booster can be a simple and inexpensive way to increase and stabilize your cell phone’s signal when you are in areas with a low signal.

Make Your Homemade Signal Booster!
It is important to keep your phone charged as fully as possible, since a weak battery may not pick up the cell signals as easily. Also, when using a signal booster, either a commercial or homemade cell phone signal booster, battery power is more quickly drained. If, after you have completed your DIY project you still don’t see enough of a boost, go to higher ground or to a clearing, or even near an intersection, where trees and buildings will not dampen the signal.
Not all of these methods will work with all cell phones. Perform these alterations at your own risk. Potential damage to your cell phone could occur, or you could void your warranty due to modification of your device. Therefore, it is not recommended you attempt any method that requires inserting anything into your phone unless it is an emergency.
Be Prepared!
Last but not least, keep in mind that the best way to face an emergency is to be prepared! That’s why we already talked about almost every detail of an unfortunate situation of this kind in our previous articles. If you had a lot of important papers in your home you need to have a family emergency binder to keep your important documents in place and secure. There you’ll find products you should have in your home, lists, and printables, tonnes of examples of non-perishable food, and many more. So, all of these are for emergencies that may occur during a lifetime:
- How to Create a 72-Hour Emergency Kit: FREE DOWNLOADABLE CHECKLIST
- 50+ Ways to Use Household Items as Emergency Supplies
- The Best Survival Tent to Have in Case of an Emergency
- 10 Ways to Keep from Freezing in the Winter (Even at 40 Below!)
- Introduction to Emergency Preparation: #10 Cans
- The Best Emergency Food to Have in Your Storage
Katy Willis is a writer, lifelong homesteader, and master herbalist, master gardener, and canine nutritionist. Katy is a preparedness expert and modern homesteader practicing everyday preparedness, sustainability, and a holistic lifestyle.
She knows how important it is to be prepared for whatever life throws at you, because you just never know what's coming. And preparedness helps you give your family the best chance to thrive in any situation.
Katy is passionate about living naturally, growing food, keeping livestock, foraging, and making and using herbal remedies. Katy is an experienced herbalist and a member of the CMA (Complementary Medical Association).
Her preparedness skills go beyond just being "ready", she's ready to survive the initial disaster, and thrive afterward, too. She grows 100% organic food on roughly 15 acres and raises goats, chickens, and ducks. She also lovingly tends her orchard, where she grows many different fruit trees. And, because she likes to know exactly what she's feeding her family, she's a seasoned from-scratch cook and gluten-free baker.
Katy teaches foraging and environmental education classes, too, including self-sufficient living, modern homesteading, seed saving, and organic vegetable gardening.
Katy helps others learn forgotten skills, including basic survival skills and self-reliance.
She's been published on sites such as MSN, Angi, Home Advisor, Family Handyman, Wealth of Geeks, Readers Digest, and more.

Pictures of the final products would help. A lot!
Why iron? surely copper wire would be best?
TY. Not exactly clear on all instructions (for example; what’s a 20amp cable connector block?).
Pics would help enormously lol.
Even with the criticism (sorry about that), I still gotta say THANK YOU. Was startin’ to think homemade boosters were a pipe dream ?
This is taken from an instructable, search that website for the full directions.