As many of you know, I am a member of the Church of Jesus Christ of Latter-Day Saints. The members of latter-day saints recently asked me to curate a list of emergency food that would be perfect for a 72-hour kit.
It is a very good idea to have a 72-hour kit full of non-perishable food just in case a disaster strikes. Whether it be a natural disaster or a power outage, it is smart to have an emergency food supply for an emergency situation.
I thought I’d post a bit about what I came up with here as it would be helpful to anyone trying to put together 72-hour food kits for a large group.
The 72 Hour Kit List And What You’ll Read About
Before I get started on the food you might consider including in your kit, I want to mention that the food that goes in your kit is only one small part of a full 72-hour kit.
If you would like, I can walk you step by step through what to include (and what not to include), in your 72-hour kit list, and how to make it fit your budget and your family’s individual needs. Check out this ebook plan.
- I’ll start by telling you what my goals were with this 72-hour kit list and why I created all the lists the way I did.
- Then I’ll give you the details: I will tell you what you will be eating for each meal each day, where I bought everything, and what it all costs. (Yes, you have my permission to scroll down right to this section if you’d like to right now.)
- Last, I’ll give you links where you can download menu labels for each day and handouts that you can use when planning your kits with your group!
My Goals Regarding The 72-Hour Kit List
This was quite a project as I really wanted to meet a few basic needs: the 72-hour kit list should be affordable for everybody, the food should have a lot of calories, taste super good, and require no cooking.
1. Affordable 72-Hour Survival Kit List
The cost of food adds up quickly. Having to buy three days worth of emergency supplies and emergency food all at once at the grocery store in addition to your regular spending can seem daunting, especially for large families. The Church of Jesus Christ of Latter-Day Saints certainly has its fair share of large families, so I did not want the cost to deter people from taking this important step.
So, I set a goal to keep the cost for each meal at $2 or less per person, and I ended up beating this goal!
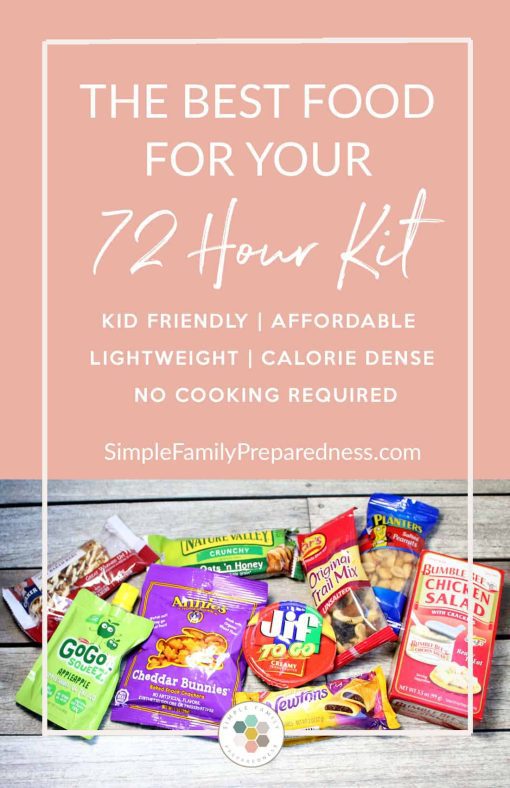
2. High in Calories Foodstuffs For The 72-Hour Food Kit List
In most disaster situations, you actually would not need your survival kit. For example, in a house fire, you’d likely be able to go to a friend or family member’s home. You wouldn’t grab your 72-hour kit and go camp out at the park! Or, in an earthquake, you’d likely still stay at (or near) your home once it was over and have access to all the food in your home, not just your kit (well, at least anything that isn’t destroyed).
So, in reality, the only time you’d actually use your kit is if you had to quickly evacuate, and the evacuation radius was wide enough that you couldn’t quickly get to a family/friend’s home. This means, you’d likely be expending a lot of energy and would need calories. I looked at many other 72-hour food kit lists online, and most offered only 600-1000 calories a day. Hunger makes both my kids and I (and maybe you, I’m guessing?) terribly grumpy! In my opinion, a large-scale disaster is not the time to cut your calorie consumption by half or more.
I set a goal to get calorie consumption at 1500 calories a day or more while including at least some nutrient-dense foods. I also ended up beating this goal!
3. The 72-Hour Kit Requires No Cooking
I wanted this for a few reasons.
First, many items that need to be cooked (canned soups, stews, chilis, etc.) are heavy and would add significant weight to your packs. In addition, “just add water and cook” type meals require extra water…and water is HEAVY! Ideally, since you may have to carry them, your packs should be as light as possible. Also, the foods on this list have a long shelf life, so you know your food supply will last as long as you need!
Second, if you truly are evacuating on foot, simple will be best. I know that even in my nice home when I have a bad day, I prefer making a simple meal to a complicated one. During an evacuation, it will be much easier to pull out a granola bar, open it and give it to my child than to pull out the stove, the fuel, light it, then the can opener, open the can, wait for it to cook, then dig through my pack to find bowls, cups, spoons, etc.
Third, many families do not already have a small portable stove, lightweight mess kit, etc. This would be an added expense to them and may again deter them from getting their kits altogether.
Furthermore, it might also be a good idea to throw some bottled water and a flashlight into a backpack.
I completely met this goal! None of the food requires cooking, as it is all non-perishable food and simple canned food!
4. Tasty 72-Hour Food Emergency Kits
Again, multiple reasons for this.
First, and most obviously, you are more likely to eat food that tastes good. This is especially true of children. As adults, if we know we need to eat, we are likely to eat most anything even if it doesn’t taste great.
But children are different. They may not understand how serious the situation is and will react just like they would at the regular dinner table. They will whine and complain if they don’t like something and end up not eating much. That may not regularly be a huge issue when tomorrow morning they will wake up and have pancakes, but in a true survival situation, they need to eat all they can.
Second, you are more likely to rotate food you like! When we rotate the food in our 72-hour kits, we have a PARTY! It is fun! We get out all that yummy food (stuff we don’t usually eat otherwise) and have FUN. Then, we re-stock it with more yummy food. But if the food in our kits is gross, we won’t likely rotate it. Then, it might not be usable when we need it.
This was tricky because everyone has different tastes. Also, not everything that tastes good and is high in calories is extremely nutritious! Some things in my kit are things that I might not want my kids eating every day (sugary, salty, processed, etc), but it is stuff they really enjoy. Other things are relatively nutrient-dense. I figured this would work for most families without serious allergies in a survival situation.
The Emergency 72-Hour Food Kit List: Results & Details
Now, that you are aware of all the criteria I wanted to follow in the process of creating this kit, you are ready to find out the result!
1503 Calories per Day and $1.32 per Meal!
I created a 1503-calorie-a-day non-cook food kit for $11.86! That is just $1.32 a meal! Seriously! I was so proud of myself that I had to call my mom to brag. It took hours to figure it all out, but I really think it is a great kit!
In addition, if you can afford a few more dollars, you can get that kit up to over 2200 calories per day for $16.29. That is still under $2 a meal at $1.81!
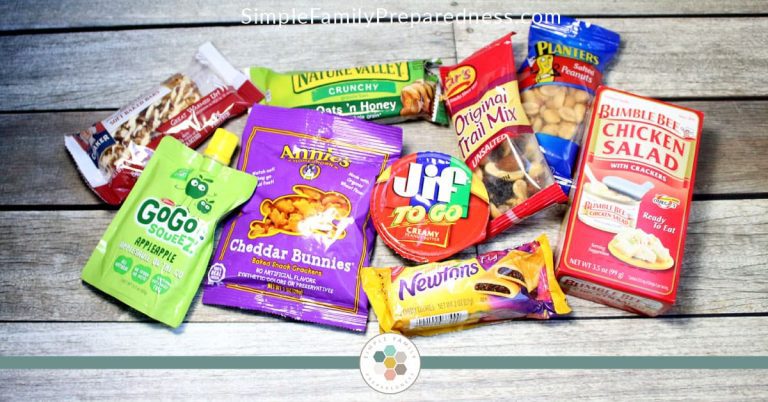
Day 1
- Breakfast: Oatmeal to Go Bar, Annie’s Bunnies, yogurt raisins
- Lunch: peanut butter and animal crackers, fruit leather
- Dinner: 4 Slim Jims, 2 chewy granola bars, Fig Newtons
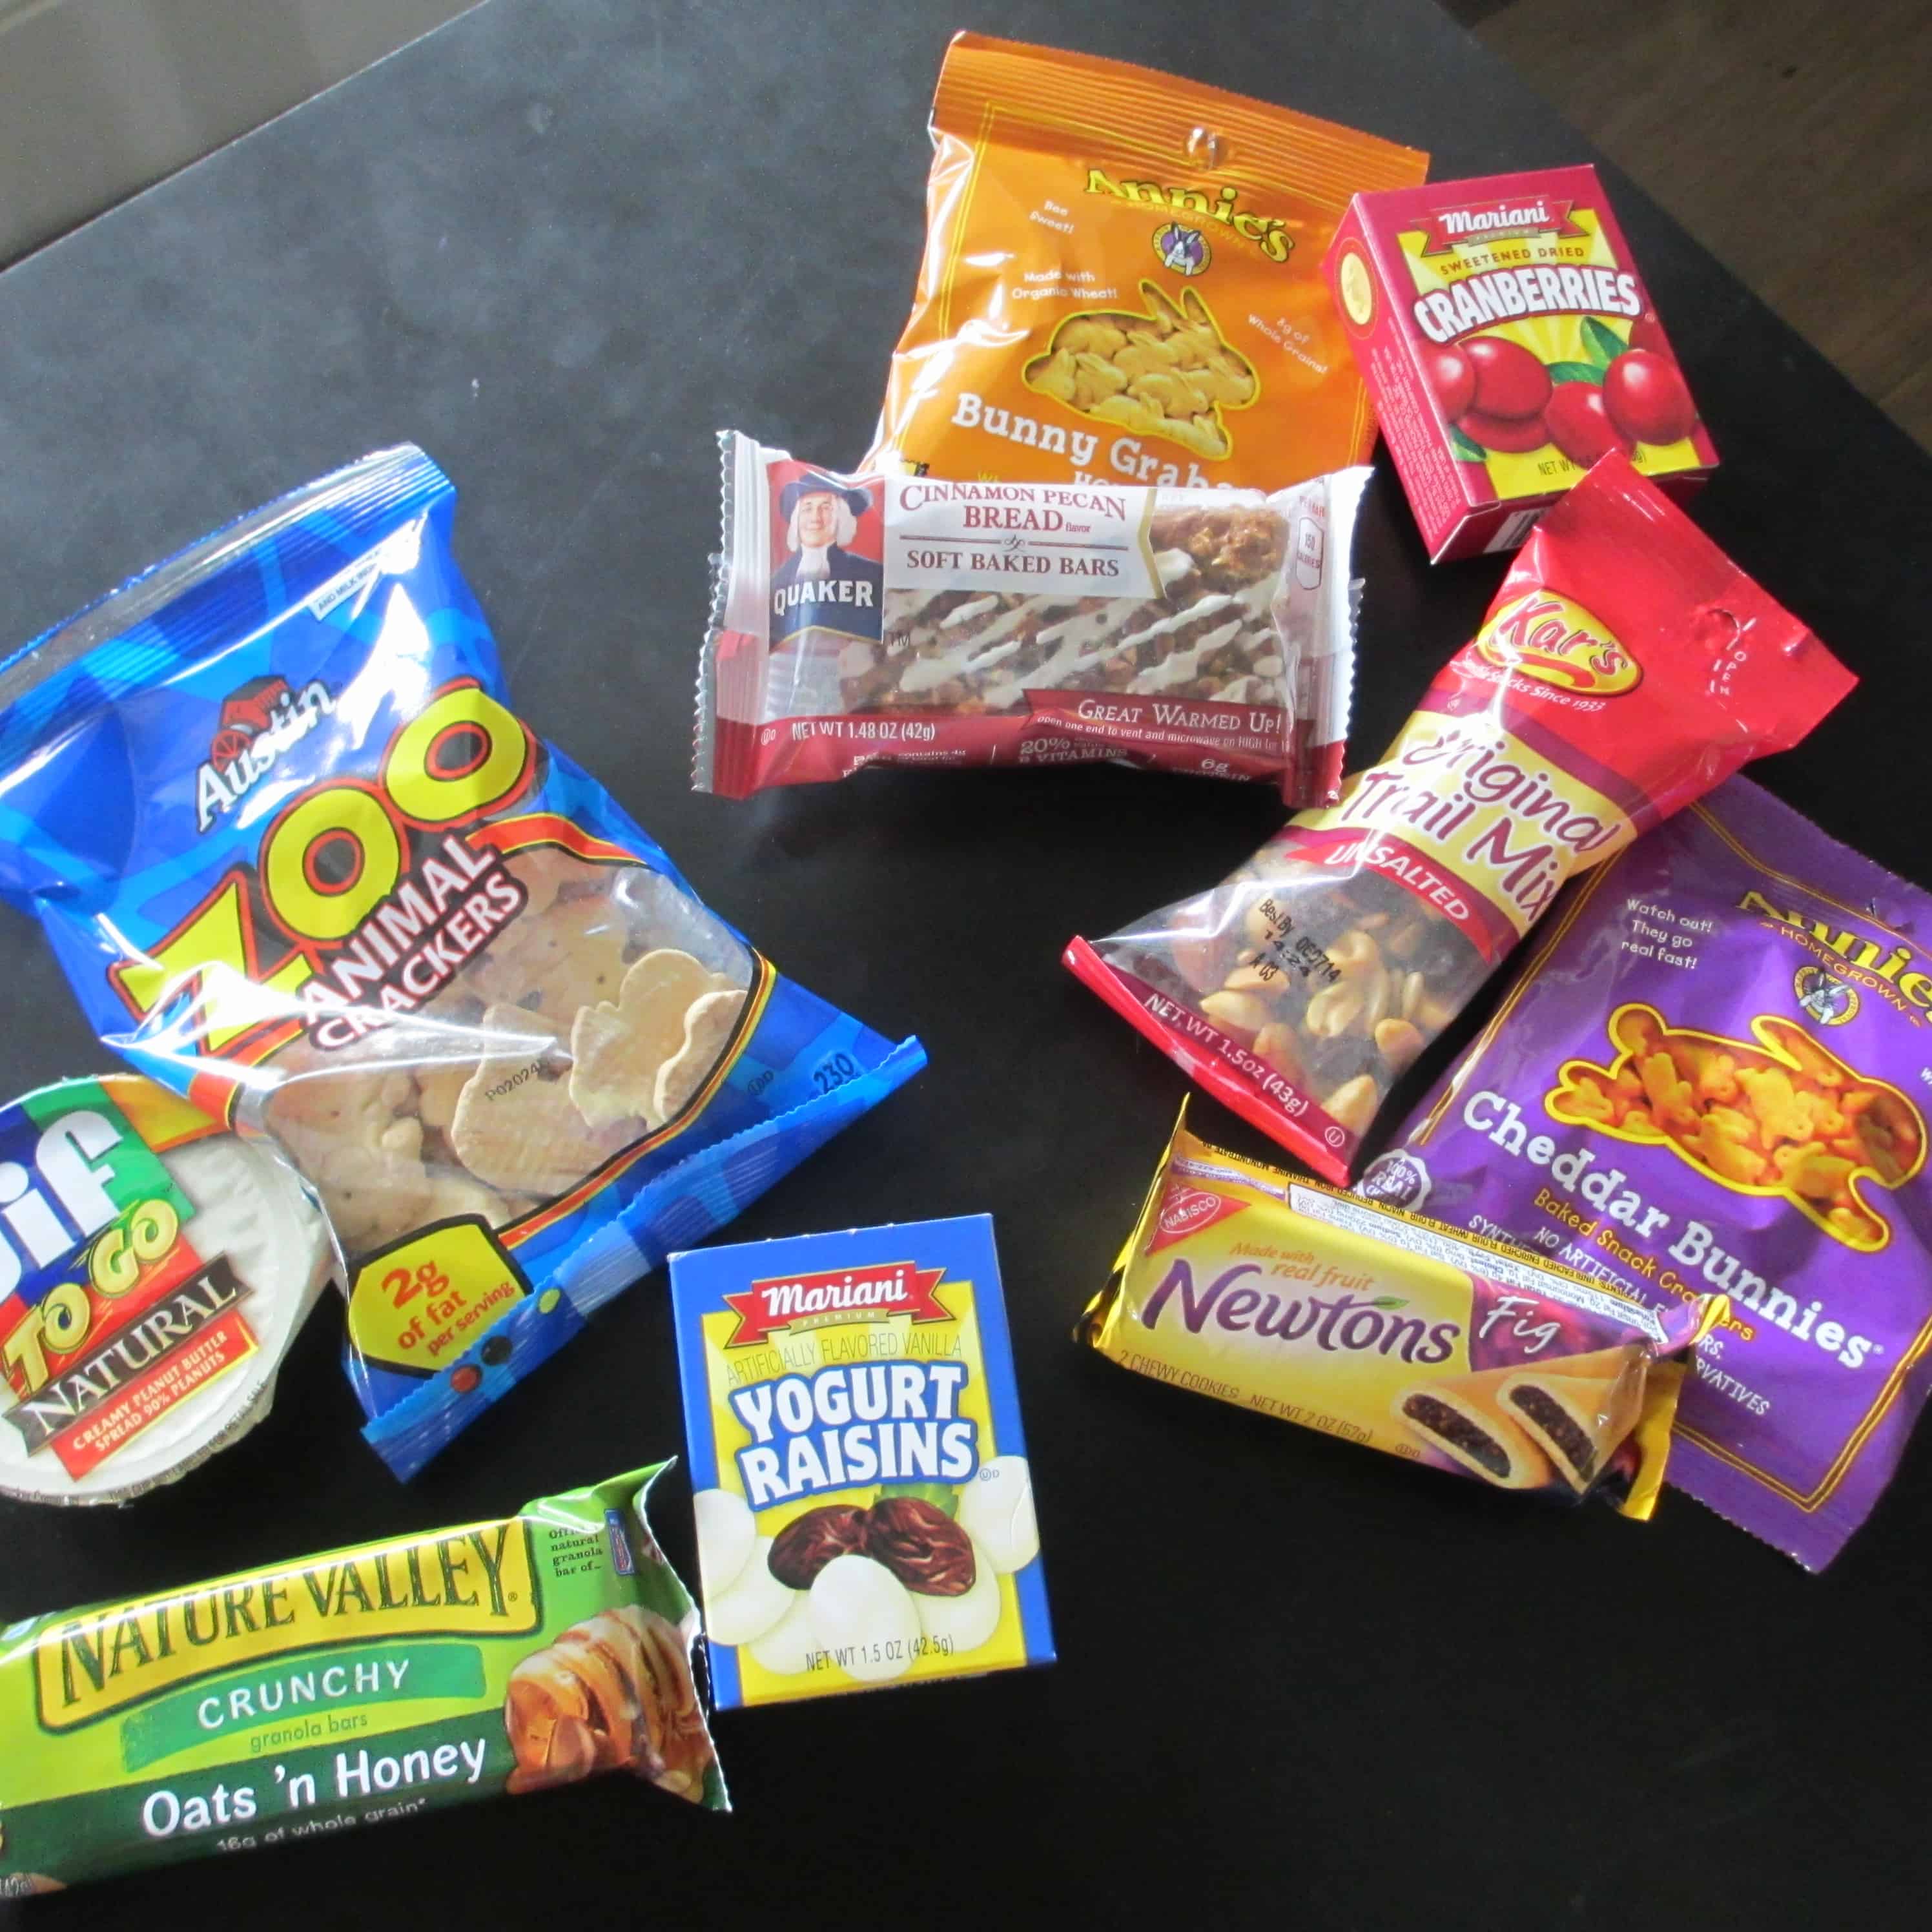
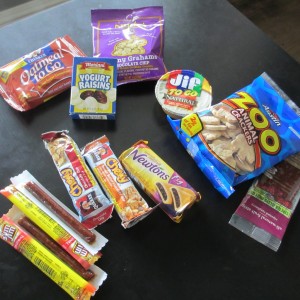
Day 2
- Breakfast: soft baked breakfast bar, Annie’s Bunnies, Craisins
- Lunch: trail mix, Annie’s Bunnies, Fig Newtons
- Dinner: peanut butter and animal crackers, crunchy granola bar, yogurt raisins

Day 3
- Breakfast: breakfast cookie, animal crackers, applesauce
- Lunch: tuna & crackers, Goldfish, fruit snacks
- Dinner: peanuts, animal crackers, yogurt raisins
Best Add-Ons for the 72-Hour Food Kit
If you are like me and want a few more calories/snacks, you can add the following products. You may only want to add some to your adult kits and keep the kids’ kits smaller, or you may add the candy to the kids, but not the adults, etc., etc.:
- An additional bag of nuts per day: Adds 170 calories per day, $0.96 additional cost per kit
- Three additional Slim Jims per day: Adds 130 calories per day, $0.96 additional cost per kit
- Six pieces of chewy candy per day: Adds 130 calories per day, $0.37 additional cost per kit
- One pantry can Peach Drink for three people: Adds 306 calories per day, and LOTS of vitamins. Enough for one cup of peach drink at each meal per person. $2.66 additional cost per kit.
So, for my family of six, I would purchase the basic $11.86 kit for everyone, add the nuts and candy for everyone, and two pantry cans of Peach Drink. My total cost would be $100.86 or $16.81 per kit ($1.87 per meal). Total calories per day per person would be 2236 per day!
The Best 72-Hour Food Kit Products: Where to Buy/Prices
Note: these prices were accurate in the fall of 2013. Current pricing may be different. Also, I try to update links in this post 2-3 times per year, but some may have changed. Use this as a general guideline.
Amazon (Using Amazon Prime for Free Shipping):
Note: Prices on Amazon change frequently
- Quaker Breakfast Cookie 36 Pkg
- Quaker Oatmeal to Go 36 Pkg (this product is no longer available from Quaker – so SAD, I’ve linked to granola bars instead, but they are not quite as high in calories)
- Animal crackers 36 Pkg
- Kar’s Trail Mix 72 Pkg
- Fig Newtons 48 Pkg
- Slim Jims 100 Pkg
- Nature Valley Crunchy Granola Bars 48 Pkg
- Planter’s Peanuts 48 Pkg
Local Walmart (or Online with Free Shipping if Spending $55+):
- Yogurt raisins
- Freeze Dried Sweetened Cranberries
- Quaker Soft Baked Breakfast Bars 6 Pkg
- Jif Peanut Butter To Go 8 Pkg
- StarKist Tuna Lunch to Go
- GoGo Squeeze Applesauce
Walgreens:
Costco:
- Annie’s Bunnies 36 Pkg: $8.65
- Fruit leather 48 Pkg: $10.59
- Goldfish crackers 24 Pkg: $7.99
- Welch’s Fruit Snacks 80 Pkg: $7.99
- Chewy Granola Bars 60 Pkg: $8.99 (Quaker brand currently on sale for this price (regularly $10.99); but Costco brand regularly $8.79 for 60)
- Hi-Chew Candies 104 Pkg: $6.39
A Few Important Notes
- Obviously, the prices in your area may vary a bit, or you may end up reading this post months or years after I post it. But, unless there has been some sort of HUGE inflation since I posted this, I believe you can easily get this 72 hr food kit for under $2/meal.
- Part of the reason I was able to get these prices was that we bought them in bulk. I went to Costco and shopped online in bulk. So, if you are to do this, it will be best to get a large group of people together! You could get your church group together or a few families in your neighborhood. You can even all rotate at the same time each year and buy your re-supplies together too!
- Also, because things are packaged in different sizes, you will NEVER be able to buy just exactly what you need for the “x” number of kits. You will always have a little extra of something. You can roll that extra cost into the cost of the kits or whoever is in charge can front the extra cost and keep the extra food. (That is what I will be doing.)
The Printables For The 72 Hour Food Kit List
There are some printables that would become super handy when you start to organize all the products. Keep in mind that when you start a 72-hour kit list, you should be prepared with a lot of labels, pens, colored highlighters (especially for the kids’ kits), and patience.
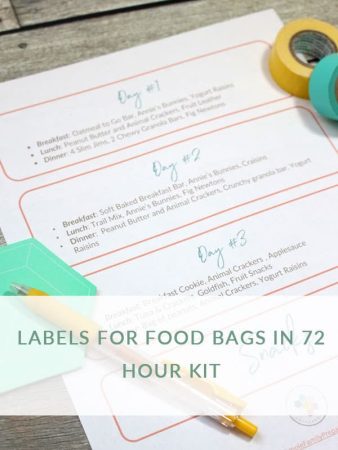
1. Printable Daily Menu Labels
Print, cut, and put on each day’s bag so you know what to eat and when. This is a wonderful idea, especially for kids. If you prepare and organize everything in time if anything,
print by clicking or on the image!
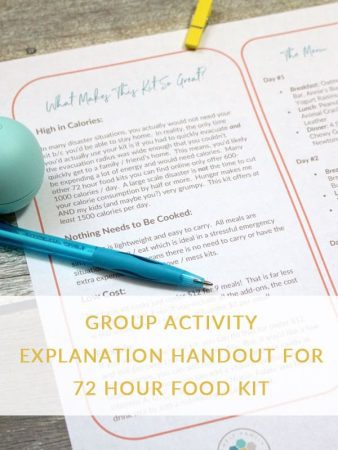
2. Informational Handout
Give this handout to anyone you’d like to invite to join your group. It should help them understand what it is you are trying to do and why you are building the kits this way! Download by clicking HERE or on the image!
Spread the Word About This 72-Hour Kit List!
This was a lot of work to put together! Over the last three years, I’ve received many requests from church members and group leaders (mostly LDS Relief Society leaders) for such a post. So, if you know a leader of a group who could benefit from this, send it to them! Share it on Facebook or pin it to Pinterest (you can use the pink buttons below).
It will save them a LOT of time (and hopefully money) while helping them create truly valuable kits for their families. With everything happening in the world during the last few years, I feel relief to have this 72-hour kit list at hand. You never know when exactly you will need it and it is cautious and responsible to be prepared anytime. There are lots of things to consider for your kit list, including rotation, cash, clothing, medicines, personal care & hygiene, and more.
The last but not least important detail is that you should always adapt this 72-hour kit list to your and your family’s needs and preferences. What is perfect for me and my little ones would not always be for you, and that’s completely fine! However, feel free to share your 72-hour kit list with us in the comments section! Also, please tell us what you think about the article and about the products I picked. I am here to learn from you!
Pin It Now For Later!

Becky is a wildlife enthusiast and pet and livestock care expert with a diploma in canine nutrition. With over a decade of experience in animal welfare, Becky lends her expertise to Simple Family Preparedness through insightful info about pets, livestock, bee keeping, and the practicalities of homesteading.
Found this after surfing Pinterst for food kit meal ideas. All of the ones I’ve seen are packed with overly sugary overly processed food, just because it’s cheap. But most meal kits I’ve seen would never be practical if you were on foot for three days burning more calories than normal. And they wouldn’t be practical if you had to live out in the elements for three days with no fuel source. Thank you for taking the time to come up with nutritious yet affordable meal kit ideas – that require no fuel usage! This will give me a huge jumpstart!
Carla from below- I know this is years later but I read your post–the “nervous eater”, you obviously can’t eat constantly in a true emergency situation, but what about chewing gum? Make sure you pack several packs for that kiddo!
Wow, kudos! I’ve never made a 72 hour food kit before, but have been reading your posts for a while and it is “one of those things” on my to-do list. But I am so impressed by how cheap and calorie-dense you made this pack! You brought up things I never thought about in an emergency, and your experience is really appreciated! I will be subbing a few items according to my families taste and preferences, but I can do that because of all the work you did here! Thank you!
Thank you so much for the kind comment Jackie! It means more than you know and I grateful you took the time to write it.
Thankyou Misty for all of your work and the sharing of this hard work for all of us. I am L.D.S. also and will be spreading this information among my ward, none L.D.S. friends family members , etec.
Thanks again for all of your hard work .
Arlene
I”m so glad it is helpful Arlene!
This is so interesting, I hope our Relief Society starts making these kids, I am for sure Thank you for the information.
Awesome meals. I can do this. There are only 3 adults here, 2 dogs and 3 cats. Whew. A lot of animals. Only one cat and one dog are house fur babies.
OK, so I may have to get different breakfast bars, but it’s doable! Thank you so much!
THANK YOU!
You are welcome!
You’ll have to find something other than the Oatmeal to Go bars – I absolutely LOVE them, but they aren’t available any more. The last time I bought them (about a year ago) I had to go to Amazon, and since then, I haven’t been able to find them. I guess the newer Nature Valley breakfast bars are closest, but they don’t have as many calories and I don’t think they taste as good.
Oh bummer! This was originally researched and published a few years back. I guess I’ll need to go double check some of that type of stuff!
Great job, Misty! This is a great list. Thank you for all your hard work in putting this together.
Glad you found it helpful Cindi!
Hello Misty,
How do you know when to rotate the rations?
I go by the date on the package plus a few months Susy! I typically check my packs every six months (in April and October) and will switch out things that are expired then.
I’ve been looking for a good kit like this, with food people like to eat. Thanks so much!
You are so welcome Scott. I’m glad it was helpful.
These are great ideas. I didn’t even think about putting the items into baggies and labeling them. Now how easy is that! Think I will do this for my grown children and give the kits to them. Fun to think about how simple and not expensive.
P.S How long does this 72 hour kit last? As far as shelf life.
Thanks
Sheina
Most everything has a 6-12 month shelf life written on the pkg. I keep mine for 12-18 months before rotating.
I am the Provident Living Specialist in our ward. I came across your this website today and I am in Heaven. Thank you so much for your hard work. I can;t imagine the time it took to put this together. I am in charge of our 72 hour kit Relief Society activity in April 2015. Your website just saved me alot of headache.. Thank you, Thank you, Thank you..
Yay! I’m so glad Sheina. That is the whole point. Thanks for letting me know!
Thank you for this post! Several boys in our Boy Scout Troop have decided they are Preppers, so my husband and I want to put them to the test. Each boy will make his own 72 hour kit, with suggestions like these. Some of them claim to have a bug out bag all ready to go, so they will need to pack all supplies in their own backpack. No borrowing from others, only fair approved trades, etc. (As leaders we will have emergency supplies available). We will camp 2 nights as see how they do. You never know how prepared you are until you test it, and I think it will be a blast to actually live off of my kit and see how I’ve done.
One suggestion I have is to remind people to take into account “nervous eating”. We have a boy who once he enters a vehicle, starts eating and doesn’t stop until he arrives at his destination. After that he’s fine. People need to account for this when making their personal kits. If all of your 72 hour kit is eaten on the road, how are you going to make it through the 72 hour period?
BTW I love the idea of rotating the kit during conferences, what a way to make kids look forward to the event. That feeling will stick with them forever. I am not LDS but many of my friends are so my family could make it a Family day with movies and board games and have a blast with it.
LOVE the idea Carla! It is so true that you really don’t know till you test it! Good Luck. I would love to hear how it goes!
This kit looks awesome, Misty! Thanks for your hard work. I am helping my ward put together 72 hour food kits and this is perfect! Do you have recommendations for children’s kits or does this pretty much cover everyone?
I’m so glad it is helpful Shielah! The kits here are just the food portion of a 72 hour kit and what i have listed works for our whole family. But there are some tips here for 72 hours kits for kids in general as part of a series of posts I did: https://simplefamilypreparedness.com/survival-kit-ideas-week-21-baby-kids/
I hope that helps!
Wow – best 72 hr. kit blog I’ve read yet! I’m doing a class in Relief Society so I wanted several different options, and yours is my favorite 🙂 I love how you shared your goals and provided the tools to set up bulk/group 72 hr. kit creation. Loooove it! Thank you sooooo much!!!
Thanks Jen! I’m truly glad you found it so helpful!
Very helpful post! I am just curious as to how you bagged up the food. Did you make a separate bag for each person’s meals so that each person has 1 for breakfast, 1 for lunch, 1 for dinner for each day? Or did you bag everyone’s food together so that breakfast for day 1 has the whole family’s food in it?
Sorry for the late response Erika. I bagged it up just exactly as I have it on the printable labels. So, each person has 3 bags total: one for each day with all three meals in one bag.
Thanks! You totally inspired me to update my 72 hour kits! I closely followed your plan, exchanging things here and there for things my family likes. But I’d been avoiding doing it because I didn’t want to have to figure it out. Thanks for making it so easy. I updated my 7 kits in about 2 hours (including shopping trip)! My 6 year old’s pack no longer contains diapers. My 13 year old had size 7 pants in his. Yikes! Thank goodness we have not needed them.
Great ideas, Misty! They would work well here in hurricane central. 🙂 Just curious — did you weigh one of these kits? It sure seems like it would be fairly light!
Weighed it just for you Cindi. 3.3 lbs. (-: Not too bad!
My husband and I have been putting together our kits for home (and our cars) and I’m so glad I found your site! I couldn’t agree more that you want your 72 hour food to be fun and yummy. Especially if everything around you is pretty grim – it will make it tiny bit better.
🙂
Yes, yummy food can always make things a bit better, right? (-:
Misty, I received my 6 in 1 tool and pocket saw. They look great and I can’t wait to try them out. Thank you for the great insight to prepping and the giveaways. I have thought a lot about food for bugging out and the items you suggested are a new way for me think about food to bug out with. Even though my wife and I will probably bug in our son and a niece live in Atlanta and our daughter lives in Austin so if we go on the road it will be to get them home. This type of food would help us to travel faster and have enough for the return trip. The last thing I would like to ask is if you would post something on clothing to bug out with. I have some thoughts on this but will comment later.
I’ve got warm clothes in my bug out kit Don. Sweat pants and sweat shirt. I figure I could always cut them if it is hot. But I’ve not given it much more thought than that. I’d love to hear your thoughts and ideas. I’m sure they’d be helpful.
I’m trying to gather clothes for my BOB currently by thrifting. Somethings we have at home but I’m specifically on a mission for the hiking style pants that zip off into shorts. I live in Minnesota, so temps varry widely from one season to the next. I want to try to keep the option to put the pants back together because nights can get cold, etc. I managed to find a pair of these pants for me for about $6 and am keeping my eyes peeled for ones for my man.
Awesome job Misty. I found this website: https://blackwoodspress.com/blog/16547/ultralight-backpacking-meal-plan/
to be very helpful for meal planning also. You can substitute several of the Thrive Life products for things that he has in his meal plans. His menu is for ultra light backpacking but can easily be used for emergency 72 hour kits. It is all about personalization when it comes to food. Again, great job!!!
Thanks Vicki!
Thank you so much Misty… this is wonderful information and I will put it to good use!
Thanks Mom! I’m so glad you like it. (-:
This is so incredibly helpful! Thank you so much for all your hard work!
Of course! Glad it is so helpful Francesca!